The Car Hacker's Handbook: A Guide for the Penetration Tester - Craig Smith (2016)
Chapter 1. UNDERSTANDING THREAT MODELS
If you come from the software penetrationtesting world, you’re probably already familiar with attack surfaces. For the rest of us, attack surface refers to all the possible ways to attack a target, from vulnerabilities in individual components to those that affect the entire vehicle.
When discussing the attack surface, we’re not considering how to exploit a target; we’re concerned only with the entry points into it. You might think of the attack surface like the surface area versus the volume of an object. Two objects can have the same volume but radically different surface areas. The greater the surface area, the higher the exposure to risk. If you consider an object’s volume its value, our goal in hardening security is to create a low ratio of risk to value.
Finding Attack Surfaces
When evaluating a vehicle’s attack surface, think of yourself as an evil spy who’s trying to do bad things to a vehicle. To find weaknesses in the vehicle’s security, evaluate the vehicle’s perimeter, and document the vehicle’s environment. Be sure to consider all the ways that data can get into a vehicle, which are all the ways that a vehicle communicates with the outside world.
As you examine the exterior of the vehicle, ask yourself these questions:
✵ What signals are received? Radio waves? Key fobs? Distance sensors?
✵ Is there physical keypad access?
✵ Are there touch or motion sensors?
✵ If the vehicle is electric, how does it charge?
As you examine the interior, consider the following:
✵ What are the audio input options: CD? USB? Bluetooth?
✵ Are there diagnostic ports?
✵ What are the capabilities of the dashboard? Is there a GPS? Bluetooth? Internet?
As you can see, there are many ways data can enter the vehicle. If any of this data is malformed or intentionally malicious, what happens? This is where threat modeling comes in.
Threat Modeling
Entire books have been written about threat modeling, but I’m going to give you just a quick tour so you can build your own threat models. (If you have further questions or if this section excites you, by all means, grab another book on the subject!)
When threat modeling a car, you collect information about the architecture of your target and create a diagram to illustrate how parts of the car communicate. You then use these maps to identify higher-risk inputs and to keep a checklist of things to audit; this will help you prioritize entry points that could yield the most return.
Threat models are typically made during the product development and design process. If the company producing a particular product has a good development life cycle, it creates the threat model when product development begins and continuously updates the model as the product moves through the development life cycle. Threat models are living documents that change as the target changes and as you learn more about a target, so you should update your threat model often.
Your threat model can consist of different levels; if a process in your model is complicated, you should consider breaking it down further by adding more levels to your diagrams. In the beginning, however, Level 2 is about as far as you’ll be able to go. We’ll discuss the various levels in the following sections, beginning with Threat Level 0.
Level 0: Bird’s-Eye View
At this level, we use the checklist we built when considering attack surfaces. Think about how data can enter the vehicle. Draw the vehicle in the center, and then label the external and internal spaces. Figure 1-1 illustrates a possible Level 0 diagram.
The rectangular boxes are the inputs, and the circle in the center represents the entire vehicle. On their way to the vehicle, the inputs cross two dotted lines, which represent external and internal threats.
The vehicle circle doesn’t represent an input but rather a complex process—that is, a series of tasks that could be broken down further. Processes are numbered, and as you can see, this one is number 1.0. If you had more than one complex piece in your threat model, you would number those in succession. For instance, you would label a second process 2.0; a third, 3.0; and so on. As you learn about your vehicle’s features, you update the diagram. It’s okay if you don’t recognize all of the acronyms in the diagram yet; you will soon.
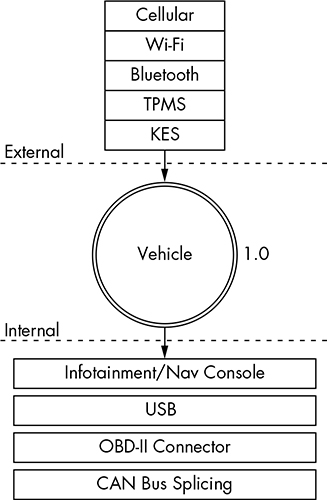
Figure 1-1: Level 0 inputs
Level 1: Receivers
To move on to the Level 1 diagram, pick a process to explore. Because we have only the one process in our diagram, let’s dig in to the vehicle process and focus on what each input talks to.
The Level 1 map shown in Figure 1-2 is almost identical to that in Level 0. The only difference is that here we specify the vehicle connections that receive the Level 0 input. We won’t look at the receivers in depth just yet; we’re looking only at the basic device or area that the input talks to.
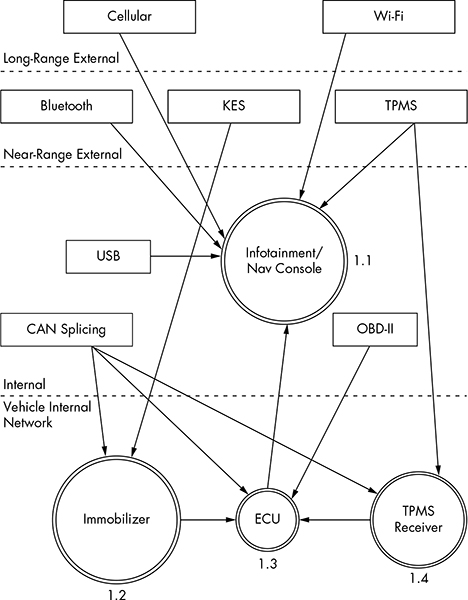
Figure 1-2: Level 1 map of inputs and vehicle connections
Notice in Figure 1-2 that we number each receiver. The first digit represents the process label from the Level 0 diagram in Figure 1-1, and the second digit is the number of the receiver. Because the infotainment unit is both a complex process and an input, we’ve given it a process circle. We now have three other processes: immobilizer, ECU, and TPMS Receiver.
The dotted lines in the Level 1 map represent divisions between trust boundaries. The inputs at the top of the diagram are the least trusted, and the ones at the bottom are the most trusted. The more trust boundaries that a communication channel crosses, the more risky that channel becomes.
Level 2: Receiver Breakdown
At Level 2, we examine the communication taking place inside the vehicle. Our sample diagram (Figure 1-3) focuses on a Linux-based infotainment console, receiver 1.1. This is one of the more complicated receivers, and it’s often directly connected to the vehicle’s internal network.
In Figure 1-3, we group the communications channels into boxes with dashed lines to once again represent trust boundaries. Now there’s a new trust boundary inside the infotainment console called kernel space. Systems that talk directly to the kernel hold higher risk than ones that talk to system applications because they may bypass any access control mechanisms on the infotainment unit. Therefore, the cellular channel is higher risk than the Wi-Fi channel because it crosses a trust boundary into kernel space; the Wi-Fi channel, on the other hand, communicates with the WPA supplicant process in user space.
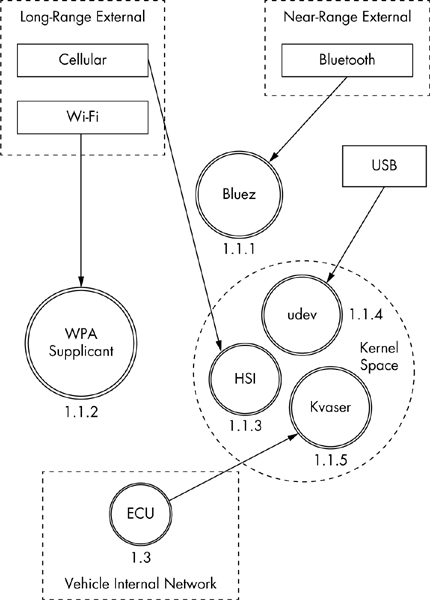
Figure 1-3: Level 2 map of the infotainment console
This system is a Linux-based in-vehicle infotainment (IVI) system, and it uses parts common to a Linux environment. In the kernel space, you see references to the kernel modules udev, HSI, and Kvaser, which receive input from our threat model. The udev module loads USB devices, HSI is a serial driver that handles cellular communication, and Kvaser is the vehicle’s network driver.
The numbering pattern for Level 2 is now X.X.X, and the identification system is the same as before. At Level 0, we took the vehicle process that was 1.0 and dove deeper into it. We then marked all processes within Level 1 as 1.1, 1.2, and so on. Next, we selected the infotainment process marked 1.1 and broke it down further for the Level 2 diagram. At Level 2, therefore, we labeled all complex processes as 1.1.1, 1.1.2, and so on. (You can continue the same numbering scheme as you dive even deeper into the processes. The numbering scheme is for documentation purposes; it allows you to reference the exact process at the appropriate level.)
NOTE
Ideally at this stage, you’d map out which processes handle which inputs, but we’ll have to guess for now. In the real world, you’d need to reverse engineer the infotainment system to find this information.
When building or designing an automotive system, you should continue to drill down into as many complex processes as possible. Bring in the development team, and start discussing the methods and libraries used by each application so you can incorporate them into their own threat diagrams. You’ll likely find that the trust boundaries at the application level will usually be between the application and the kernel, between the application and the libraries, between the application and other applications, and even between functions. When exploring these connections, mark methods that have higher privileges or that handle more sensitive information.
Threat Identification
Now that we’ve gone two levels deep into our threat modeling maps, we can begin to identify potential threats. Threat identification is often more fun to do with a group of people and a whiteboard, but you can do it on your own as a thought exercise.
Let’s try this exercise together. Start at Level 0—the bird’s-eye view—and consider potential high-level problems with inputs, receivers, and threat boundaries. Now let’s list all potential threats with our threat models.
Level 0: Bird’s-Eye View
When determining potential threats at Level 0, try to stay high level. Some of these threats may seem unrealistic because you’re aware of additional hurdles or protections, but it’s important to include all possible threats in this list, even if some have already been addressed. The point here is to brainstorm all the risks of each process and input.
The high-level threats at Level 0 are that an attacker could:
✵ Remotely take over a vehicle
✵ Shut down a vehicle
✵ Spy on vehicle occupants
✵ Unlock a vehicle
✵ Steal a vehicle
✵ Track a vehicle
✵ Thwart safety systems
✵ Install malware on the vehicle
At first, it may be difficult to come up with a bunch of attack scenarios. It’s often good to have people who are not engineers also participate at this stage because as a developer or an engineer, you tend to be so involved in the inner workings that it’s natural to discredit ideas without even meaning to.
Be creative; try to come up with the most James Bond-villain attack you can think of. Maybe think of other attack scenarios and whether they could also apply to vehicles. For example, consider ransomware, a malicious software that can encrypt or lock you out of your computer or phone until you pay money to someone controlling the software remotely. Could this be used on vehicles? The answer is yes. Write ransomware down.
Level 1: Receivers
Threat identification at Level 1 focuses more on the connections of each piece rather than connections that might be made directly to an input. The vulnerabilities that we posit at this level relate to vulnerabilities that affect what connects to the devices in a vehicle.
We’ll break these down into threat groupings that relate to cellular, Wi-Fi, key fob (KES), tire pressure monitor sensor (TPMS), infotainment console, USB, Bluetooth, and controller area network (CAN) bus connections. As you can see in the following lists, there are many potential ways into a vehicle.
Cellular
An attacker could exploit the cellular connection in a vehicle to:
✵ Access the internal vehicle network from anywhere
✵ Exploit the application in the infotainment unit that handles incoming calls
✵ Access the subscriber identity module (SIM) through the infotainment unit
✵ Use a cellular network to connect to the remote diagnostic system (OnStar)
✵ Eavesdrop on cellular communications
✵ Jam distress calls
✵ Track the vehicle’s movements
✵ Set up a fake Global System for Mobile Communications (GSM) base station
Wi-Fi
An attacker could exploit the Wi-Fi connection to:
✵ Access the vehicle network from up to 300 yards away or more
✵ Find an exploit for the software that handles incoming connections
✵ Install malicious code on the infotainment unit
✵ Break the Wi-Fi password
✵ Set up a fake dealer access point to trick the vehicle into thinking it’s being serviced
✵ Intercept communications passing through the Wi-Fi network
✵ Track the vehicle
Key Fob
An attacker could exploit the key fob connection to:
✵ Send malformed key fob requests that put the vehicle’s immobilizer in an unknown state. (The immobilizer is supposed to keep the vehicle locked so it can’t be hotwired. We need to ensure that it maintains proper functionality.)
✵ Actively probe an immobilizer to drain the car battery
✵ Lock out a key
✵ Capture cryptographic information leaked from the immobilizer during the handshake process
✵ Brute-force the key fob algorithm
✵ Clone the key fob
✵ Jam the key fob signal
✵ Drain the power from the key fob
Tire Pressure Monitor Sensor
An attacker could exploit the TPMS connection to:
✵ Send an impossible condition to the engine control unit (ECU), causing a fault that could then be exploited
✵ Trick the ECU into overcorrecting for spoofed road conditions
✵ Put the TPMS receiver or the ECU into an unrecoverable state that might cause a driver to pull over to check for a reported flat or that might even shut down the vehicle
✵ Track a vehicle based on the TPMS unique IDs
✵ Spoof the TPMS signal to set off internal alarms
Infotainment Console
An attacker could exploit the infotainment console connection to:
✵ Put the console into debug mode
✵ Alter diagnostic settings
✵ Find an input bug that causes unexpected results
✵ Install malware to the console
✵ Use a malicious application to access the internal CAN bus network
✵ Use a malicious application to eavesdrop on actions taken by vehicle occupants
✵ Use a malicious application to spoof data displayed to the user, such as the vehicle location
USB
An attacker could use a USB port connection to:
✵ Install malware on the infotainment unit
✵ Exploit a flaw in the USB stack of the infotainment unit
✵ Attach a malicious USB device with specially crafted files designed to break importers on the infotainment unit, such as the address book and MP3 decoders
✵ Install modified update software on the vehicle
✵ Short the USB port, thus damaging the infotainment system
Bluetooth
An attacker could use a Bluetooth connection to:
✵ Execute code on the infotainment unit
✵ Exploit a flaw in the Bluetooth stack of the infotainment unit
✵ Upload malformed information, such as a corrupted address book designed to execute code
✵ Access the vehicle from close ranges (less than 300 feet)
✵ Jam the Bluetooth device
Controller Area Network
An attacker could exploit the CAN bus connection to:
✵ Install a malicious diagnostic device to send packets to the CAN bus
✵ Plug directly in to a CAN bus to attempt to start a vehicle without a key
✵ Plug directly in to a CAN bus to upload malware
✵ Install a malicious diagnostic device to track the vehicle
✵ Install a malicious diagnostic device to enable remote communications directly to the CAN bus, making a normally internal attack now an external threat
Level 2: Receiver Breakdown
At Level 2, we can talk more about identifying specific threats. As we look at exactly which application handles which connection, we can start to perform validation based on possible threats.
We’ll break up threats into five groups: Bluez (the Bluetooth daemon), the wpa_supplicant (the Wi-Fi daemon), HSI (high-speed synchronous interface cellular kernel module), udev (kernel device manager), and the Kvaser driver (CAN transceiver driver). In the following lists, I’ve specified threats to each program.
Bluez
Older or unpatched versions of the Bluez daemon:
✵ May be exploitable
✵ May be unable to handle corrupt address books
✵ May not be configured to ensure proper encryption
✵ May not be configured to handle secure handshaking
✵ May use default passkeys
wpa_supplicant
✵ Older versions may be exploitable
✵ May not enforce proper WPA2 style wireless encryption
✵ May connect to malicious access points
✵ May leak information on the driver via BSSID (network interface)
HSI
✵ Older versions may be exploitable
✵ May be susceptible to injectable serial communication (man-in-the-middle attacks in which the attacker inserts serial commands into the data stream)
udev
✵ Older, unpatched versions may be susceptible to attack
✵ May not have a maintained whitelist of devices, allowing an attacker to load additional drivers or USB devices that were not tested or intended for use
✵ May allow an attacker to load foreign devices, such as a keyboard to access the infotainment system
Kvaser Driver
✵ Older, unpatched versions may be exploitable
✵ May allow an attacker to upload malicious firmware to the Kvaser device
These lists of potential vulnerabilities are by no means exhaustive, but they should give you an idea of how this brainstorming session works. If you were to go to a Level 3 map of potential threats to your vehicle, you would pick one of the processes, like HSI, and start to look at its kernel source to identify sensitive methods and dependencies that might be vulnerable to attack.
Threat Rating Systems
Having documented many of our threats, we can now rate them with a risk level. Common rating systems include DREAD, ASIL, and MIL-STD-882E. DREAD is commonly used in web testing, while the automotive industry and government use ISO 26262 ASIL and MIL-STD-882E, respectively, for threat rating. Unfortunately, ISO 26262 ASIL and MIL-STD-882E are focused on safety failures and are not adequate to handle malicious threats. More details on these standards can be found at http://opengarages.org/index.php/Policies_and_Guidelines.
The DREAD Rating System
DREAD stands for the following:
Damage potential How great is the damage?
Reproducibility How easy is it to reproduce?
Exploitability How easy is it to attack?
Affected users How many users are affected?
Discoverabilty How easy is it to find the vulnerability?
Table 1-1 lists the risk levels from 1 to 3 for each rating category.
Table 1-1: DREAD Rating System
|
Rating category |
High (3) |
Medium (2) |
Low (1) |
|
|
D |
Damage potential |
Could subvert the security system and gain full trust, ultimately taking over the environment |
Could leak sensitive information |
Could leak trivial information |
|
R |
Reproducibility |
Is always reproducible |
Can be reproduced only during a specific condition or window of time |
Is very difficult to reproduce, even given specific information about the vulnerability |
|
E |
Exploitability |
Allows a novice attacker to execute the exploit |
Allows a skilled attacker to create an attack that could be used repeatedly |
Allows only a skilled attacker with in-depth knowledge to perform the attack |
|
A |
Affected users |
Affects all users, including the default setup user and key customers |
Affects some users or specific setups |
Affects a very small percentage of users; typically affects an obscure feature |
|
D |
Discoverability |
Can be easily found in a published explanation of the attack |
Affects a seldom-used part, meaning an attacker would need to be very creative to discover a malicious use for it |
Is obscure, meaning it’s unlikely attackers would find a way to exploit it |
Now we can apply each DREAD category from Table 1-1 to an identified threat from earlier in the chapter and score the threat from low to high (1-3). For instance, if we take the Level 2 HSI threats discussed in “Level 2: Receiver Breakdown” on page 10, we can come up with threat ratings like the ones shown in Table 1-2.
Table 1-2: HSI Level 2 Threats with DREAD Scores
|
HSI threats |
D |
R |
E |
A |
D |
Total |
|
An older, unpatched version of HSI that may be exploitable |
3 |
3 |
2 |
3 |
3 |
14 |
|
An HSI that may be susceptible to injectable serial communication |
2 |
2 |
2 |
3 |
3 |
12 |
You can identify the overall rating by using the values in the Total column, as shown in Table 1-3.
Table 1-3: DREAD Risk Scoring Chart
|
Total |
Risk level |
|
5-7 |
Low |
|
8-11 |
Medium |
|
12-15 |
High |
When performing a risk assessment, it’s good practice to leave the scoring results visible so that the person reading the results can better understand the risks. In the case of the HSI threats, we can assign high risk to each of these threats, as shown in Table 1-4.
Table 1-4: HSI Level 2 Threats with DREAD Risk Levels Applied
|
HSI threats |
D |
R |
E |
A |
D |
Total |
Risk |
|
An older, unpatched version of HSI that may be exploitable |
3 |
3 |
2 |
3 |
3 |
14 |
High |
|
An HSI that may be susceptible to injectable serial communication |
2 |
2 |
2 |
3 |
3 |
12 |
High |
Although both risks are marked as high, we can see that the older version of the HSI model poses a slightly higher risk than do the injectable serial attacks, so we can make it a priority to address this risk first. We can also see that the reason why the injectable serial communication risk is lower is that the damage is less severe and the exploit is harder to reproduce than that of an old version of HSI.
CVSS: An Alternative to DREAD
If DREAD isn’t detailed enough for you, consider the more detailed risk methodology known as the common vulnerability scoring system (CVSS). CVSS offers many more categories and details than DREAD in three groups: base, temporal, and environmental. Each group is subdivided into sub areas—six for base, three for temporal, and five for environmental—for a total of 14 scoring areas! (For detailed information on how CVSS works, see http://www.first.org/cvss/cvss-guide.)
NOTE
While we could use ISO 26262 ASIL or MIL-STD-882E when rating threats, we want more detail than just Risk = Probability × Severity. If you have to pick between these two systems for a security review, go with MIL-STD-882E from the Department of Defense (DoD). The Automotive Safety Integrity Level (ASIL) system will too often have a risk fall into the QM ranking, which basically translates to “meh.” The DoD’s system tends to result in a higher ranking, which equates to a higher value for the cost of a life. Also, MIL-STD-882E is designed to be applied throughout the life cycle of a system, including disposal, which is a nice fit with a secure development life cycle.
Working with Threat Model Results
At this point, we have a layout of many of the potential threats to our vehicle, and we have them ranked by risk. Now what? Well, that depends on what team you’re on. To use military jargon, the attacker side is the “red team,” and the defender side is the “blue team.” If you’re on the red team, your next step is to start attacking the highest risk areas that are likely to have the best chance of success. If you’re on the blue team, go back to your risk chart and modify each threat with a countermeasure.
For example, if we were to take the two risks in “The DREAD Rating System” on page 11, we could add a countermeasure section to each. Table 1-5 includes the countermeasure for the HSI code execution risk, and Table 1-6 includes the countermeasure for the risk of HSI interception.
Table 1-5: HSI Code Execution Risk
|
Threat |
Executes code in the kernel space |
|
Risk |
High |
|
Attack technique |
Exploit vulnerability in older versions of HSI |
|
Countermeasures |
Kernel and kernel modules should be updated with the latest kernel releases |
Table 1-6: Intercepting HSI Commands
|
Threat |
Intercepts and injects commands from the cellular network |
|
Risk |
High |
|
Attack technique |
Intercept serial communications over HSI |
|
Countermeasures |
All commands sent over cellular are cryptographically signed |
Now you have a documented list of high-risk vulnerabilities with solutions. You can prioritize any solutions not currently implemented based on the risk of not implementing that solution.
Summary
In this chapter you learned the importance of using threat models to identify and document your security posture, and of getting both technical and nontechnical people to brainstorm possible scenarios. We then drilled down into these scenarios to identify all potential risks. Using a scoring system, we ranked and categorized each potential risk. After assessing threats in this way, we ended up with a document that defined our current product security posture, any countermeasure currently in place, and a task list of high-priority items that still need to be addressed.