Close Up Photography in Nature (2014)
7
Special Photo Techniques for Butterflies and Dragonflies
I’ve already mentioned some generalities of shooting butterflies and dragonflies, but let’s supply considerably more detail now. I developed an intense interest in these insects while studying entomology—the study of insects—at Central Michigan University in 1975. That was four decades ago, but my interest in those fascinating flying flowers and delightfully dashing dragons continues to grow.
While butterflies and dragonflies can be quite challenging to successfully photograph, they are at the same time interesting and fun. Both can make stunning images, and both are easy to find in their favored habitat during the warmer months. Insect species have distinctive life cycles. Some require specific habitats, others need specific plants or food, and some species need both. Some fly only a week or two, giving a narrow window of opportunity for photographers. Others, such as the Monarch and Mourning Cloak, live for several months over a wide range of habitats, so they’re much less challenging to find.
One difficulty making butterflies challenging photographic targets is that they are most active when ambient temperatures are warmer than 60 degrees Fahrenheit (F). When temperatures are warm, many are wary, elusive, skittish, and hard to approach. Another downside to their favored flight times of mid-day hours is that the bright sun creates harsh shadows and hard-to-tame contrast. This may force the use of flash, as reflectors are difficult if not impossible to employ on a fast-flitting and fluttering butterfly. Also during those hours, breezes commonly make the butterfly’s fragile roosts and perches wiggle and wobble. This complicates the task of getting sharp images, especially when the shooter is striving to achieve fairly parallel alignment of the butterfly wings and camera sensor.
Have I discouraged you? I hope not, because we will reveal many strategies that will actually make butterfly photography enjoyable as well as productive.
I grew up in the beautiful state of Michigan, which abounds with over 125 species of butterflies. Many species are plentiful during their flight season, especially in the northern portions of the state where light farming results in lower insecticide use. Therefore, butterfly populations are more robust. Some butterflies such as the Green Comma that overwinter as adults in brush piles begin to appear in Michigan during March, and some are still flying on chilly October days. Yet most species have more limited flight tenures of around a month, while still others fly a mere couple of weeks. As the year moves from spring through summer and into fall, the serious butterfly photographer must constantly look for new species.
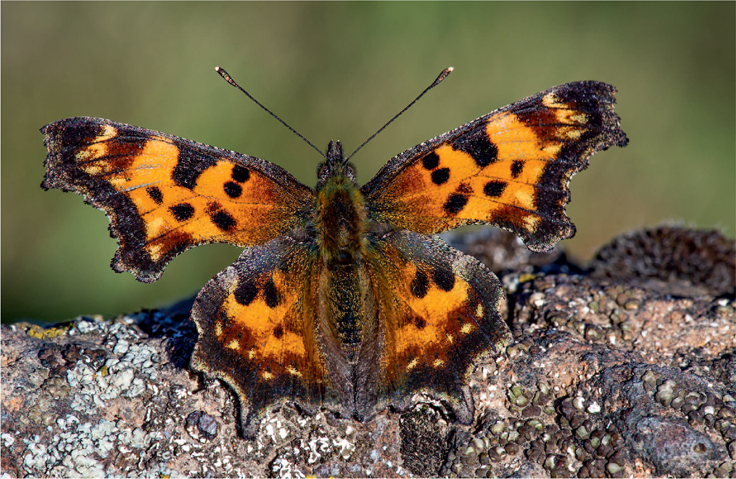
Like many butterflies, this Green Comma is basking on rocks to warm up on a cool morning. Canon 5D Mark III, 180mm, 1/30, f/22, ISO 250, Cloudy.
Michigan is blessed with innumerable small inland lakes and surrounded by Lake Superior, Lake Michigan, and Lake Huron—each known as one of the Great Lakes for a very good reason. From the vast and chilly Lake Superior to the state’s tiniest pond, their collective addition to Michigan’s atmospheric moisture, combined with the commonly cool nighttime temperatures of Michigan’s northern latitudes, often generates very heavy formations of dew. It’s in the dew-laden meadows where plentiful specimens of some butterflies—Monarchs, Black Swallowtails, Bronze Coppers, Orange Sulfurs—and many other species roost at night.
A cold butterfly is a photographable butterfly! Butterflies, dragonflies, and other insects are cold blooded. Most are inactive at temperatures below 60 degrees F, and especially when heavily coated with large drops of dew. Incidentally, dew occurs when the air is calm and the air temperature drops to or below the dew point, which is the temperature at which air of a given humidity becomes saturated. Under those conditions, the lethargic butterflies may notice your presence, but they cannot flee. You usually have ample time to set up and shoot. Barbara and I have for decades enjoyed making images of dew-laden butterflies in the meadows around Munising in Michigan’s Upper Peninsula. Year after year, our August workshop students, both first-timers as well as many repeaters, make many memorable butterfly images during the crack o’dawn field trips to the nearby meadows.
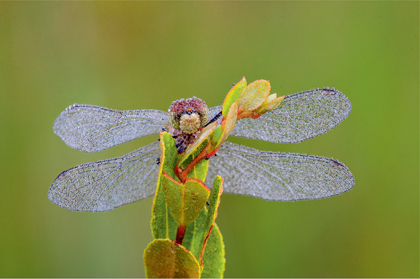
Remembering that insects are cold blooded and thus easy to photograph on a cool morning, this dew-laden dragonfly remained perfectly still for at least 30 minutes and did not begin to move until the sunshine warmed it. Canon 10D, 180mm, 1/1.4, f/16, ISO 100, Auto.
HOW TO FIND BUTTERFLIES AND DRAGONFLIES
Certain species of stunning butterflies and dragonflies like to roost on the shrubs, grasses, and flowers that grow in the meadows. They can be found by searching the small meadows that border ponds and lakes as well as meadows that have forest growth along one or more sides. Dragonflies are aquatic creatures most of their lives and are more commonly found in meadows near bodies of water. Moreover, a steady source of water encourages the growth of wildflowers, which in turn attracts butterflies. Tall trees along the meadow borders are helpful because they block the early morning sun from warming the insects and to some degree moderate the awakening of the morning breezes. The meadow air can remain completely still for a couple of hours after sunrise before the sun finally warms the meadow, livening the butterflies, arousing the breezes, and sending wiser photographers who recognize the impossible shooting conditions to a nearby restaurant.
If the morning wind is light or calm and the temperature is low enough for heavy dew formation, begin your search at the first hint of light. The light will usually be bright enough to find subjects, although you will probably have to wait until about 15 minutes before actual sunrise for adequate shooting light. By then you should have found several photogenic subjects in locations that you’ve marked with inexpensive fiberglass electric fence posts or colorful ribbons tied to a nearby plant. Don’t use your hat. I used to do that until I had lost every hat I owned and I’m now alarming the insects with reflections from my increasingly shiny forehead.
Walk slowly when scouting for insects. It might seem fruitless at first, but keep working at it. Your score will improve. Walk eastward while looking intently at all of the plants in the meadow because the dew-laden subjects are softly backlit by the brightening eastern sky and thus are easier to spot. Walking westward has the subjects front-lit and visually blending into their backgrounds, making them more difficult to see. When walking to the east, nicely backlit subjects like dragonflies and spider webs can often be seen from 20 yards away. On a cool morning with heavy dew, diligent searching can easily turn up dozens of nice webs and dragonflies in a mere 20 minutes of searching. Concentrate on looking for bright spots near the tops of the plants as you look toward the east. Usually the source turns out to be an odd-colored leaf, but sometimes it turns out to be a photogenic gem.
Not so very translucent, butterflies are more difficult to spot than dragonflies and spider webs, but you may sometimes locate them with a careful search. Finding a couple of butterflies each morning is a good average. Some mornings you will be skunked like a frustrated fruitless fisherman, and other mornings, especially after a big butterfly hatch, you’ll be awash in photogenic beauty.
The dewdrops and strands of spider web are typical on a dewy morning. Canon 5D Mark III, 180mm, 1/13, f/18, ISO 100, Sun.
It’s well worth repeating that you should arrive at the meadow as soon as there’s enough light to see. The more time spent searching, the greater the likelihood of finding the best photo opportunities. I recall an incident worth repeating. One of our workshop students made the mistake of setting up to shoot the first and only dragonfly he discovered that morning. He had never before seen a dew-coated dragonfly, was oblivious to its being in poor condition with damaged wings, but he was so enthralled that he spent most of the morning shooting the one bedraggled dragonfly. Suggestions that he find other specimens fell on deaf ears, and he was as happy as the proverbial clam with his images—until he disappointedly saw what the other students had photographed when they projected their images later in the week. Other students were working only a few yards away on two splendid pristine dragonflies wonderfully arranged on a single Gray-headed Coneflower blossom. They made images vastly more engaging than those of the overly hasty shooter. The moral of the story is to look first, find the best subjects, and then shoot them thoroughly.
FIND THE OPTIMUM SUBJECTS
Look first and shoot later. Let’s expand on that. We can’t overstress the importance of this rule. Having critiqued zillions of images over the years, Barbara and I can assure you that your insect portfolio will be far more enhanced by a few excellent images than by many mediocre ones. Excellent shots come from excellent subjects, not from a host of different angles and exposures of a tired and shopworn subject. That being said, when you do find a truly worthwhile subject, by all means shoot it every which way you can think of. Do not shoot it just one way as so many “got it” shooters do. Shoot it from the front, the rear, from down low, from up high, from the right and the left. Also consider using frontal light, back light, and side light. Use reflectors and diffusers. Use fill-flash, main flash, and always mix the flash with ambient light. Experienced close-up shooters will meticulously work a good subject from beginning to end, exercising as many creative ideas as they can bring to mind in their relentless pursuit of gorgeous images.
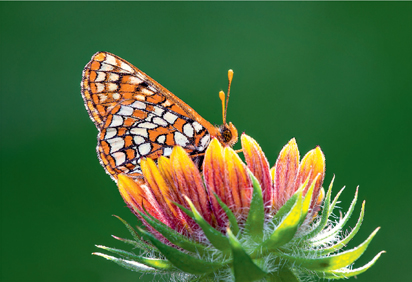
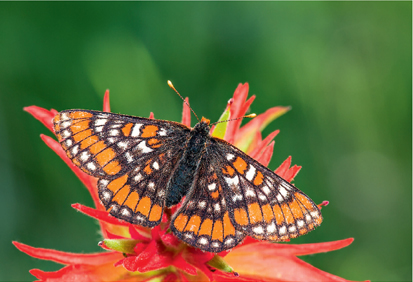
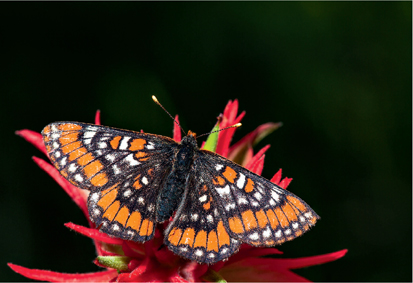
Checkerspots are a colorful group of small butterflies. The back lighting and the fill-flash to reduce the contrast work nicely here. Nikon D4, 200mm, 1/6, f/22, ISO 200, Cloudy, fill-flash with a Nikon SB-800.
Always look for other interesting compositions. Since this checkerspot is cooperative, Barbara changes her shooting angle to create a completely different image. Nikon D4, 200mm, 1/6, f/22, ISO 200, Cloudy, fill-flash with a Nikon SB-800.
A SUCCESSFUL MORNING
Suppose your diligent morning search is so successful that you discover five dew-laden butterflies and seventeen dewy dragonflies. Which specimens should be photographed first? Consider all of the factors. Suppose further, that two of the butterflies are Monarchs, two are Atlantis Fritillaries, and one is an uncommon Coral Hairstreak. Both Monarchs are in excellent condition because they recently emerged from their chrysalis. One is roosting on an unattractive brown plant stem, and the other is on a pristine Gray-headed Coneflower blossom. Both of the Atlantis Fritillaries are roosting on coneflowers, but one is less colorful because it has been flying longer and has lost numerous wing scales and has a few tears in the wings. The Coral Hairstreak, a handsome fellow indeed, is roosting on a fern leaf close to the ground in a difficult location for photography. Most of the dragonflies are roosting near the top of the grass seed heads, though two are sleeping on flowers. One is on a coneflower in the middle of the meadow. Another is perched on a purple Spotted Knapweed blossom. If you have approximately 90 minutes before the rising sun generates breezes and ugly contrast, which evaporates the dewdrops and wakes the subjects, which should be shot first?
Give thought to first shooting the Monarch on the coneflower blossom. The bright yellow coneflower complements the orange butterfly and adds an attractive element to the image. The nicer of the two Atlantis Fritillaries is also a good choice. The Monarch on the coneflower and the perfect Atlantis Fritillary should be your first two photo subjects. For a third choice, consider the Coral Hairstreak butterfly. Although it’s roosting in a difficult spot, here is where you can use the sharp pointed scissors in your camera bag to clip the leaf on which it is sleeping and move it to a better spot. Pick a spot that not only allows better camera access, but also provides a favorable height, an uncluttered background, shadow-free ambient light if available, and, if not, unfettered access for a reflector, diffuser, or flash. If it’s cool enough, and you move very slowly and very gently, it’s easy to move the slumbering butterfly to an optimized location, photograph it, and return it unharmed to its former location. Often, though, the prize subject warms up and flies away before you are finished photographing it. When you find an opportunity with such a beautiful subject, shoot it thoughtfully and thoroughly, as you may never again find another.
Let’s address our seventeen dewy dragonflies. We found so many dragonflies because they are more numerous than butterflies in northern Michigan meadows. So we prioritized the butterflies, and now we can consider the two “dragons” that are sleeping on flowers as they each offer an opportunity to make an exquisite image. Does it matter which to shoot first? Yes. It has often been said that size matters, but sunlight matters too. The dragonfly in mid-meadow is likely to be first to receive contrasty light from the rising sun and be first to warm up and flit away. Shoot it first. The other dragonfly, protected to some degree by the tall trees, will be shielded from direct sunshine and its harsh shadows. This dragonfly will remain dormant until much later because it remains shaded longer. Photograph it later.
This Coral Hairstreak is heavily coated with dew and roosts on a Bracken Fern. Canon 10D, 180mm, 1/2, f/11, ISO 100, Shade.
Texas is blessed with a huge variety of butterfly species. This Buckeye basked in the dawn sun only for a minute or two before it flew away on a warm morning. The cooler the morning, the more time there is to photograph naturally chilled insects. Nikon D3, 200mm, 1/13, f/20, ISO 200, Cloudy, Aperture-priority, fill-flash.
The subject ranking game plan can be applied to any group of insect subjects found in your diligent search of the meadow. We call it the shoot into the shadows strategy. It’s best implemented by beginning on the west side of the meadow because the rising sun illuminates that side first. Then gradually move eastward, striving to remain in the shadows for as long as practicable. It’s a good system for meadows with trees or a tall hill on the east side. We’re always mindful of where we find those meadows so we can go back often.
Remember that we’ve talked a lot about naturally chilled and slumberous insects, but if you’re awaiting a butterfly to spread its wings, set up on a target where the sun will soon rise. Many butterflies spread their wings and face them toward the sun to warm up. This basking warms them up quickly. But, if you are in position ahead of time when they spread their wings, it is often easy to shoot gorgeous images of them for a few minutes before they sail away on gently flapping wings.
PHOTOGRAPHING THE MONARCH
There may be no single correct way to photograph a butterfly, but there are certainly some excellent ways. Here’s how Barbara and I approach it: We always use a long macro lens, such as the Canon 180mm f/3.5, the Nikon 200mm micro f/4, or the Sigma 180mm f/2.8. These long focal length lenses offer large working distances that reduce the likelihood of alarming the subject, narrow angles of view giving good background control, rotatable tripod collars for convenient camera orientation, and they are optically optimized for close-up photography.
Let’s assume the Monarch is hanging from the edge of the coneflower in a way suggesting a horizontal (landscape) composition. We see that the coneflower, being 2 or 3 feet tall, is gently swaying in the slightly moving air. We stabilize it by employing a light stand or electric fence post, or some other stake, where we attach one end of a Plamp. The other end is attached to the coneflower’s stem as close as possible to the Monarch without intruding into the frame. Techniques for Butterflies and Dragonflies Voila! We’re well along the road to a tack-sharp image, but be especially cautious when attaching the Plamp to the coneflower so as not to alert the sleepy butterfly, which may flick its wings and cast off the dewdrops. The keys to your success are the slow care and precision of the surgeon when deliberate and delicate movements are required.

Monarch butterflies regularly roost on Gray-headed coneflowers. The natural dewdrops on the flower and the butterfly add considerable interest. When the butterfly warms, it will spread its wings and angle them toward the sun for a couple of minutes before launching into flight. A Plamp is attached to the flower’s stem to hold the butterfly perfectly still. Nikon D3, 200mm, 1/3, f/22, ISO 200, Cloudy, fill-flash.
The soft light occurring minutes before sunrise is low in contrast, but blue in color. If shooting JPEGs, we can set our white balance to Shade and eliminate most of the blue colorcast. If shooting RAW files, we can decide whether to ignore the color in favor of adjusting it in post-capture editing or using Shade WB to remove it in the camera. We set our aperture to f/18 as a reasonable compromise between good depth-of-field to avoid the image-softening diffraction effects of f/22 and f/32.
In the soft early morning light, we might opt to shoot toward the west for smooth frontal lighting. When the sun finally peeks over the horizon or trees, we immediately move to the other side and shoot to the east, taking advantage of the pretty back lighting on the translucent butterfly wings and the flower. If the butterfly is not readily accessible from both sides, your scissors can be used to clip a leaf that blocks the view! Don’t overdo it! Clipped leaf stems that appear in the image detract from it. If the contrast is too high when shooting into the back light, it’s time for some light modification. We can use a reflector, perhaps a gold one if we want warmer light, or we can use our flash. Although Barb and I used reflectors for this task over many years, we’ve recently been relying more on our flash units for adding extra light. Either way, we have good control over fill light. We can adjust it by varying the position and/or angle of the reflector. If using a flash, varying the angle of a flash burst, adjusting the flash compensation control, or diffusing the flash are all effective ways to modify the light.
CORAL HAIRSTREAK
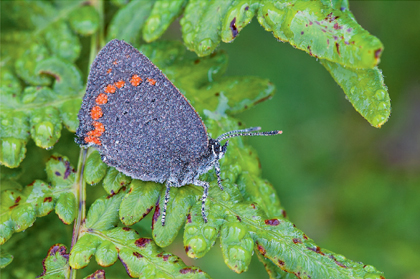
The tiny Coral Hairstreak is only the size of a nickel and we don’t find them very often, making it the next subject on our list. Their diminutive dimensions make them difficult to spot in the meadows where we photograph. This Coral Hairstreak (see page 166) was found roosting nearly at ground level on non-native unprotected and invasive Bracken Ferns, so once again we can use our pointed scissors to cut a small portion of the Bracken Fern leaf and move it to a better shooting location. In a shaded spot, we can attach the severed fern leaf to a Plamp at a convenient shooting height. We make sure that the background is of a reasonably constant color and tonality and is far enough away that even at our shooting aperture of f/18, it is blurred and featureless without distracting detail. To shoot the butterfly, we use a series of steps to create sharp images and light them well. Here’s the sequence.
1.Mount the camera securely on a sturdy tripod.
2.Compose the image by looking through the viewfinder. Though many students compose with the Live View display, we find it is easier looking through the viewfinder.
3.Next activate the Live View display and magnify it by 10x for critical manual focusing.
4.We use a reflector or more often the flash to alter the contrast and improve the color.
5.Trigger the camera with a remote release or the self-timer.
6.Confirm the lighting by examining the image on the rear LCD panel.
7.Confirm the exposure with the RGB histogram, and observe if any blinkies appear in the image when it is shot.
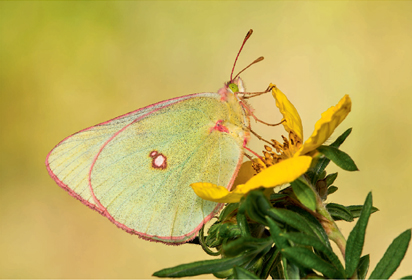
Some butterflies do not spread their wings to bask. Sulfurs are lateral baskers that angle their wings to be at a right angle to the sun. Nikon D4, 200mm, 1/30, f/22, ISO 200, Cloudy, fill-flash.
When we’ve photographed it until we can think of no other way to do it, we just leave it in place until the rising sun awakens its dormant slumbers and it happily flies away. If we need to use the Plamp right away, then we gently move the fern leaf with the butterfly to a safe place among the ferns. Don’t bother waiting for it to spread its wings because this species will not—it just keeps its wings closed while sporadically reorienting itself to optimize absorption of the sun’s warmth. Butterfly mavens call this behavior lateral basking.
ATLANTIS FRITILLARY
Our hypothetical meadow search turned up two Atlantis fritillaries. The one with the missing wing scales, we’ll just ignore. The prime specimen gets all of our attention. If in a good spot for composition, for access, and for lighting, we’ll shoot it in place. Often, we’ll have to lie on the ground. Even though Barb and I are members of AARP (an organization for retired people), we’re a long way from retirement—such a long way that we’re still limber enough to lie on the ground. Many of our workshop students can’t get up once down on the ground! Our smiling offer to provide a fork-lift truck generally results in a dirty look. If you are one of the few that can’t get down, or can’t get up, or both, just gently and safely move the butterfly to a better location. Of course, the more you fuss with the perch the subject is on or with nearby vegetation, the greater the chance the photo will be ruined.
WHEN THE BUTTERFLY SPREADS ITS WINGS
The lethargic chilled butterflies must come up to a higher temperature to be able to fly, and butterflies are well adapted to absorb heat. Some species—sulfurs and whites—have wings folded above the thorax, and they orient their wings to be perpendicular to the rays of the sun. This maximizes the wing area exposed to the sun’s warming rays. This is the lateral basking behavior we’ve mentioned, and when up to a comfortable temperature, the butterfly promptly takes flight and goes about its daily business.
Other species, including Monarchs, most fritillaries, and Mourning Cloaks, spread their wings flat and orient them to maximize heat absorption from the sun. In this position, the rate of heat rise increases because the exposed area of both wings is twice that of the single wing surface presentation of the sulfurs and whites.
The spread wings of the butterfly are wonderful photographic targets with exquisite colors and details. Fortunately, butterflies demonstrate a certain lack of concern with a slowly moving nearby photographer and may remain spread for several minutes before launching into flight. You must be alert and ready to shoot immediately upon seeing the wings spread. The exposure, lighting, approximate composition, and focus must all be set. Using a remote release, shoot as soon as you set precise focus and the final composition to accommodate the spread wings. Keep shooting and continue making fine adjustments from shot to shot until the butterfly takes flight. Slow movements are absolutely crucial when the butterfly spreads its wings. Any fast movement of the hand or the arm will often instantly spook the butterfly into flight. Be sure you understand and abide by the last sentence or you will ruin many wonderful opportunities. Butterflies are petrified (I think) of fast-moving objects! Move slowly when a butterfly spreads its wings. Noise, however, does not seem to bother them, so feel free to talk.
Speaking of trigger devices, Barb and I began in 2012 to use two PocketWizard Plus III radio transceivers to trip the shutter. They are easy to use and very reliable even over long distances and around corners. One unit is attached to the camera hotshoe and connected via a dedicated electrical cord. The other is in a pocket and easy to reach at any instant we want to trip the shutter. They’re admittedly expensive, and a simple wired electrical release works well for most close-up operations. We have used wired cable releases for years and currently still do with great success. Lately, though, I have been using the release button (REL) on the Canon 600 EX-RT flash (Menu 2) when this flash is set to radio control and Slave and the Speedlite Transmitter ST-E3-RT is used.
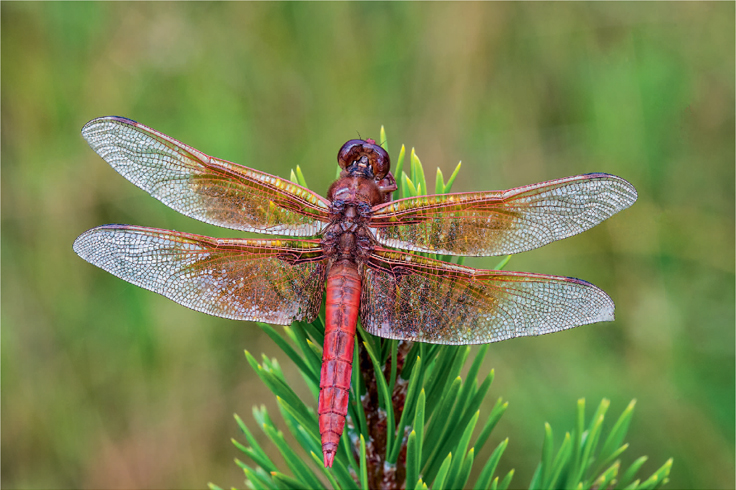
Gorgeous Red Skimmer dragonflies are abundant in the thermal areas of Yellowstone National Park during September. Canon 5D Mark III, 180mm, 1/2, f/18, ISO 200, Cloudy, fill-flash.
When a butterfly does flush, observe whether it alights nearby. Occasionally they’ll just continue their basking on another nearby perch, allowing another opportunity for the photographer who can unobtrusively move tripod and camera into a new position and resume shooting. Of course, if you’re shooting handheld, it may be easier to pursue a butterfly hither and yon as it seeks new perches. Irrespective of whether you are handholding or using a tripod, let me nag you once more that one must, absolutely must, move very slowly and very gently to avoid spooking the butterfly into flight! Butterflies will react to any quick movements, although if you very slowly cast a shadow over the catnapping chromatic creatures, they might assume you’re just a passing cloud and obligingly spread their wings to soak up a few more rays.
WHAT ABOUT THE DRAGONFLIES?
Have we forgotten the two dew-drenched dragonflies sleeping on flowers and begging to be photographed? Once again, carefully attach a Plamp to the flower stem to stabilize the flower and its four-winged guest. Work the subject thoroughly using the best techniques for capturing sharp, well-composed, and well-exposed images. Use our shoot into the shadows scheme, first shooting the one in mid-meadow and probably first to be impacted by the rising sun. Then shoot the one remaining in the shade with its advantageous low-contrast light.
The dragonflies’ translucent wings, especially when bejeweled with dew, photograph best when backlit. Shoot toward the rising sun, but be aware of possible lens flare. Often, a slight change of shooting angle of the camera can minimize the flare, and be sure to use a proper lens hood. Even when the sun has not risen or is blocked by trees, the eastern sky still creates a soft back light. Dragonflies can have more than one plane that needs proper focus, and when they are immobilized by a cold morning, they’re a great subject for successful focus stacking.
Insect photographers are probably a hundred percent aware that it’s better to shoot in the cool air of dawn. For butterflies that roost in meadows, the technique is very effective. But what about the many species that do not roost in meadows? What about the ones that roost in dense bushes, in trees, and like certain politicians, in undisclosed locations? We’re acutely aware that we’ve never found a Mourning Cloak or a Western Tiger Swallowtail butterfly roosting in a meadow. Let’s discuss how to find those elusive entomological critters.
Butterfly life revolves around air temperature. Sunny warm days will find virtually all butterflies flitting freely about the landscape. If a thunderstorm passes through, the rain will bring all the frenetic activity to a swift and unceremonious halt. If the storm is associated with a cold front with a significant temperature drop, the butterflies will remain perched and wait out the storm. They’re too cold to fly in that state and will willingly pose until eventually warmed. When the temperature finally does rise, they’ll fly about in a less frenzied pace, often pausing for a basking session to warm up and once again offer another good opportunity for the observant photographer.
It is also productive to search meadows in the evening. Even if the light is unfavorable for shooting, a beautiful benumbed butterfly will be right there in the better light of the coming daybreak. Keep in mind though, that a gorgeous setup crying out for you to return by the dawn’s early light can be rendered photographically futile when you awaken to the discouraging sounds of blustery winds and drenching rain.

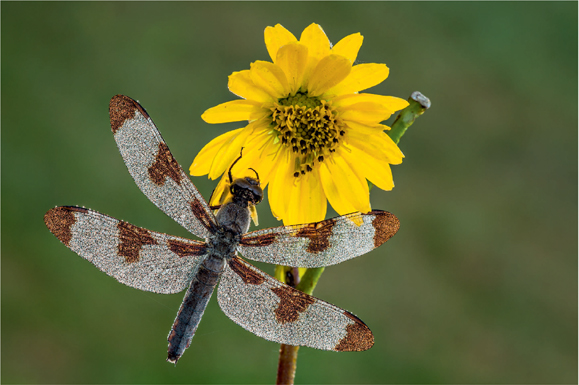
This small damselfly is sleeping on leatherleaf. Damselflies are related to dragonflies, but hold their wings high above their backs, rather than flat like Red Skimmers. Nikon D70, 200mm, 1/8, f/13, ISO 200, Auto.
This Twelve-spot Dragonfly is in pristine condition. Nikon D4, 200mm, 1/3, f/22, ISO 200, Shade.
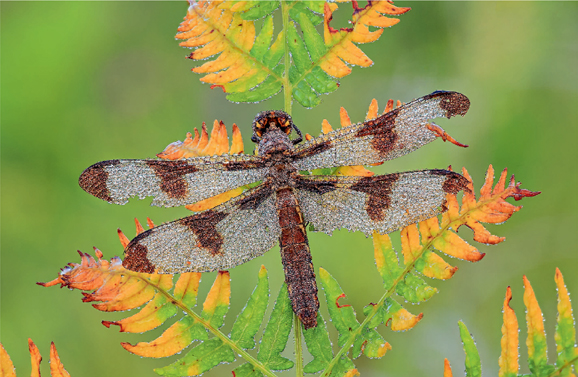
The dewdrops make this Twelve-spot Dragonfly interesting, but the poor condition of this individual is bother-some. Notice the many missing wing sections. Canon 5D Mark III, 180mm, 1/2, f/18, ISO 160, Cloudy, fill-flash.
ATTRACTING BUTTERFLIES WITH FLOWERS
Our own gardens are filled with flowers—both cultivated and wild—specifically planted to attract butterflies. Our lawn is tiny because we leave most of our 27 acres undeveloped to provide wildflowers for the native creatures and us to enjoy. Besides, those flowers bring hummingbirds every year that we very much like to photograph. Each spring we carefully scrutinize the flower and seed catalogs, and we visit commercial greenhouses to find new plants that we’d like in our garden. Some flowers are excellent butterfly attractors, including asters, mistflowers, goldenrod, sunflowers, sage, thistles, coneflowers, blazing stars, and especially the aptly named butterfly weed.
PROVIDE BUTTERFLY FOOD
Some butterflies are strongly attracted to rotting fruit like bananas and apples. Those foods entice certain species to loiter about, making them good subjects. Surprisingly, some butterflies shun flowers, preferring tree sap or animal dung. Bad news. Tree sap is sticky to work with and not good news for camera gear. What about animal dung? Well, we have three canine family members, so doggie doo is easy to find, but what cultivated connoisseur of tasteful nature photography would appreciate the aesthetics of such severely scatological images?
MUD
Yes, mud, just plain mud. Butterflies obtain plenty of moisture from their natural food sources, but wet dirt is a major attractor. When we water our small lawn in Idaho, our dirt driveway gets thoroughly soaked. On warm summer afternoons, dozens of butterflies that may include Western Tiger Swallowtails, blues, coppers, fritillaries, checkerspots, sulphurs, and whites land on the salty and mineral-laden damp soil. During these “puddling parties,” many are so oblivious to human presence that they ignore our viewfinder filling intrusions. Even if they do flush, they merely circle around and land again. And I have found that we can actually befriend a butterfly! If we keep approaching and working on the same butterfly, occasionally one will become more accepting of our presence as it comes to realize we mean no harm and may ignore us altogether.
It’s easy to photograph butterflies on mud. They’re on wet ground so the background is not too distracting even though so close that selective focus can’t blur it completely. That same closeness allows flash to be as effective on the background as it is on the butterfly in providing smooth lighting. Not to worry if you don’t have a driveway—any natural damp area can offer similar benefits. After a rainfall, pay close attention to puddles on dirt roads for the same activity, and keep an eye on the wet sandy areas along stream banks.
PHOTOGRAPHING PUDDLING BUTTERFLIES
Many butterflies seem mesmerized by damp soil, and they can be quite easy to photograph when engrossed in serious puddling. Approach slowly from the rear while crouching down so as not to cast a shadow on the butterfly and cause it to flush. If you need shade to improve the light, move slowly to attempt to emulate a passing cloud and let your shadow gradually envelop the unsuspecting butterfly. Once the butterfly is fully shaded, move in gradually while looking through the viewfinder. As the butterfly comes into focus, adjust the magnification and composition as necessary and focus carefully on the point where the wings join the thorax. Be sure to hold that focus while shooting multiple images. It is a good idea to put your camera into a high-speed continuous shooting mode and shoot as many images as you can to increase the chances of getting some in perfect focus. The limited depth-offield at these magnifications makes hitting critical focus crucial because, in this case, wings are the largest part of the butterfly, so it is essential that they be as sharp as possible.
PHOTOGRAPHING ACTIVE BUTTERFLIES IN THE WILD
As we’ve often repeated, butterflies are best photographed when dormant in chilled slumber. When the sun warms them, they’re quickly off to the races, or wherever it is that butterflies go when doing their day’s work. When the sun is invigorating butterflies, it’s casting harsh shadows over the environment and generating breezes—a duo making critical focus difficult. If you stop your lens down to achieve good DOF, even at a reasonably high ISO 800, you may not have enough shutter speed to stop the blurring motion of the rapidly beating wings.
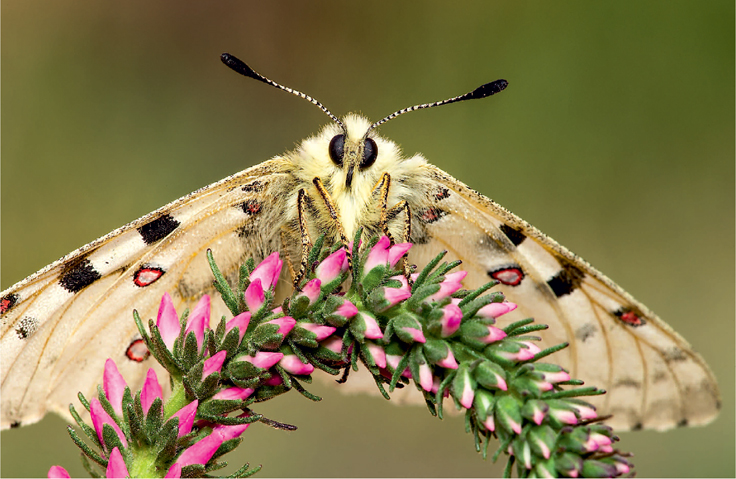
This Rocky Mountain Parnassian is slowly moving about its perch. It is impossible to use a tripod if the subject never holds still, so it is photographed handheld. Many shots were taken and only two were sharp. Nikon D4, 200mm, 1/125, f/16, ISO 800, Cloudy, fill-flash.
Many shooters see the fix for the motion problem in the use of flash. Many believe that the flash will provide lots of light and that the short flash duration is enough to stop the butterfly’s motion. Yes, both are true, but Barbara and I don’t agree it’s the best way. We rarely use flash as the only light source. Instead, we prefer to mix the flash with ambient light because of four crucial factors:
1.One or perhaps two flash units will surely freeze a butterfly’s motion while it is feeding on the nectar of a flower that’s swaying in the breeze. However, the rapid light falloff with increasing distance due to the Inverse Square Law means that we’ll probably get the black backgrounds that we dislike so much. After all, butterflies are diurnal creatures rarely seen in the dark of night—making black backgrounds intuitively seem unnatural.
2.Not only are black backgrounds unappealing to many, a very dark insect or one with dark regions around its wing edges or the black antennae can merge into a black background causing the outline of the insect to disappear.
3.Many of our students instinctively use direct frontal flash, but we think frontal lighting can make butterfly wings look “flat” by muting the colors and hiding the texture of some very pretty wings.
4.Flash is unwelcome with some butterfly enthusiasts. Some believe that flash scares the butterfly, an opinion we do not share. We have used flash to light hundreds of butterflies, and not one has indicated any sign of alarm—by flushing or by any other reaction. Some claim that the heat from the flash might harm the butterfly, but we know that isn’t true. Moreover, even though we often use two flashes to light one butterfly, we’ve never been accused of entomological pyromania and have yet to see a butterfly burst into flame. Okay, that’s silly, but we’d bet that if you’d fire your field flash pointed at your hand from the same distance you use in close-up photography, you would not even feel a hint of warmth.
Gillette’s Checkerspot is a gorgeous and rare butterfly that fortunately is rather common around our Idaho home. The green background complements its color and reveals the dark edges. Canon 5D Mark III, 180mm, 1/2, f/18, ISO 100, Cloudy, fill-flash.
The dark edges of the checkerspot merge with the black background. We feel the black background makes the image look artificial. After all, this butterfly would never spread its wings at night. All of the light is from a single Canon 600EX flash. Canon 5D Mark III, 180mm, 1/15, f/18, ISO 100, Flash.
BUTTERFLY HOUSES
The greatest variety of butterfly species is found in tropical regions where the temperatures are warm and vary little throughout the year. Travel is expensive these days. Not all butterfly photographers are able to visit the tropics. Butterfly houses are quite popular around the world. Searching the Internet may lead you to one located near you. This is especially true in the United States where they are incredibly popular.
Butterfly houses buy and raise butterflies from all over the world and release them into the temperature and humidity-controlled environment that is landscaped with plants on which butterflies usually roost and feed. These butterfly houses are filled with large varieties and massive numbers of butterflies. Many are exquisitely colored and they’re a sight to behold. Even the most nonchalant of butterfly photographers can’t help but be delighted by the unlimited shooting opportunities.
However, butterfly houses can be difficult for close-up photography. Many butterfly houses disallow or only conditionally allow tripods on the allegation that they’re hazardous to other visitors. If so restricted, you must shoot handheld. That’s not a major headache as you’ve probably already learned to do that when chasing butterflies in the wild. Here we can offer a few ideas on how to produce consistent quality butterfly images when limited by the rules and the dim lighting of a typical butterfly house. Fortunately, modern photographic gear helps a great deal. Consider the list below and then we’ll discuss the items individually.
✵High ISOs can deliver good image quality
✵Macro lenses are faster these days
✵Some macro lenses offer image stabilization
✵Automatic flash is much more sophisticated and easier to use
✵Multiple digital images do not add additional cost
Let’s contemplate each item.
HIGH ISO OPERATION
The latest wave of new digital cameras offers a gratifying ability to use high ISO numbers and still provide low-noise and high-quality images. One can easily use ISO numbers of 400, 800, and even 1600 to produce excellent quality, especially when using a camera with a full-frame sensor. That’s because large sensor cameras tend to have larger pixels that produce less digital noise due to a more favorable signal-to-noise ratio than cameras with smaller pixels. Both my Canon 5D Mark III and Barbara’s Nikon D4 shoot ISO 800 images with remarkable quality. These higher ISO sensitivities allow higher shutter speeds for arresting motion, allow smaller apertures for better DOF, or some combination of both.
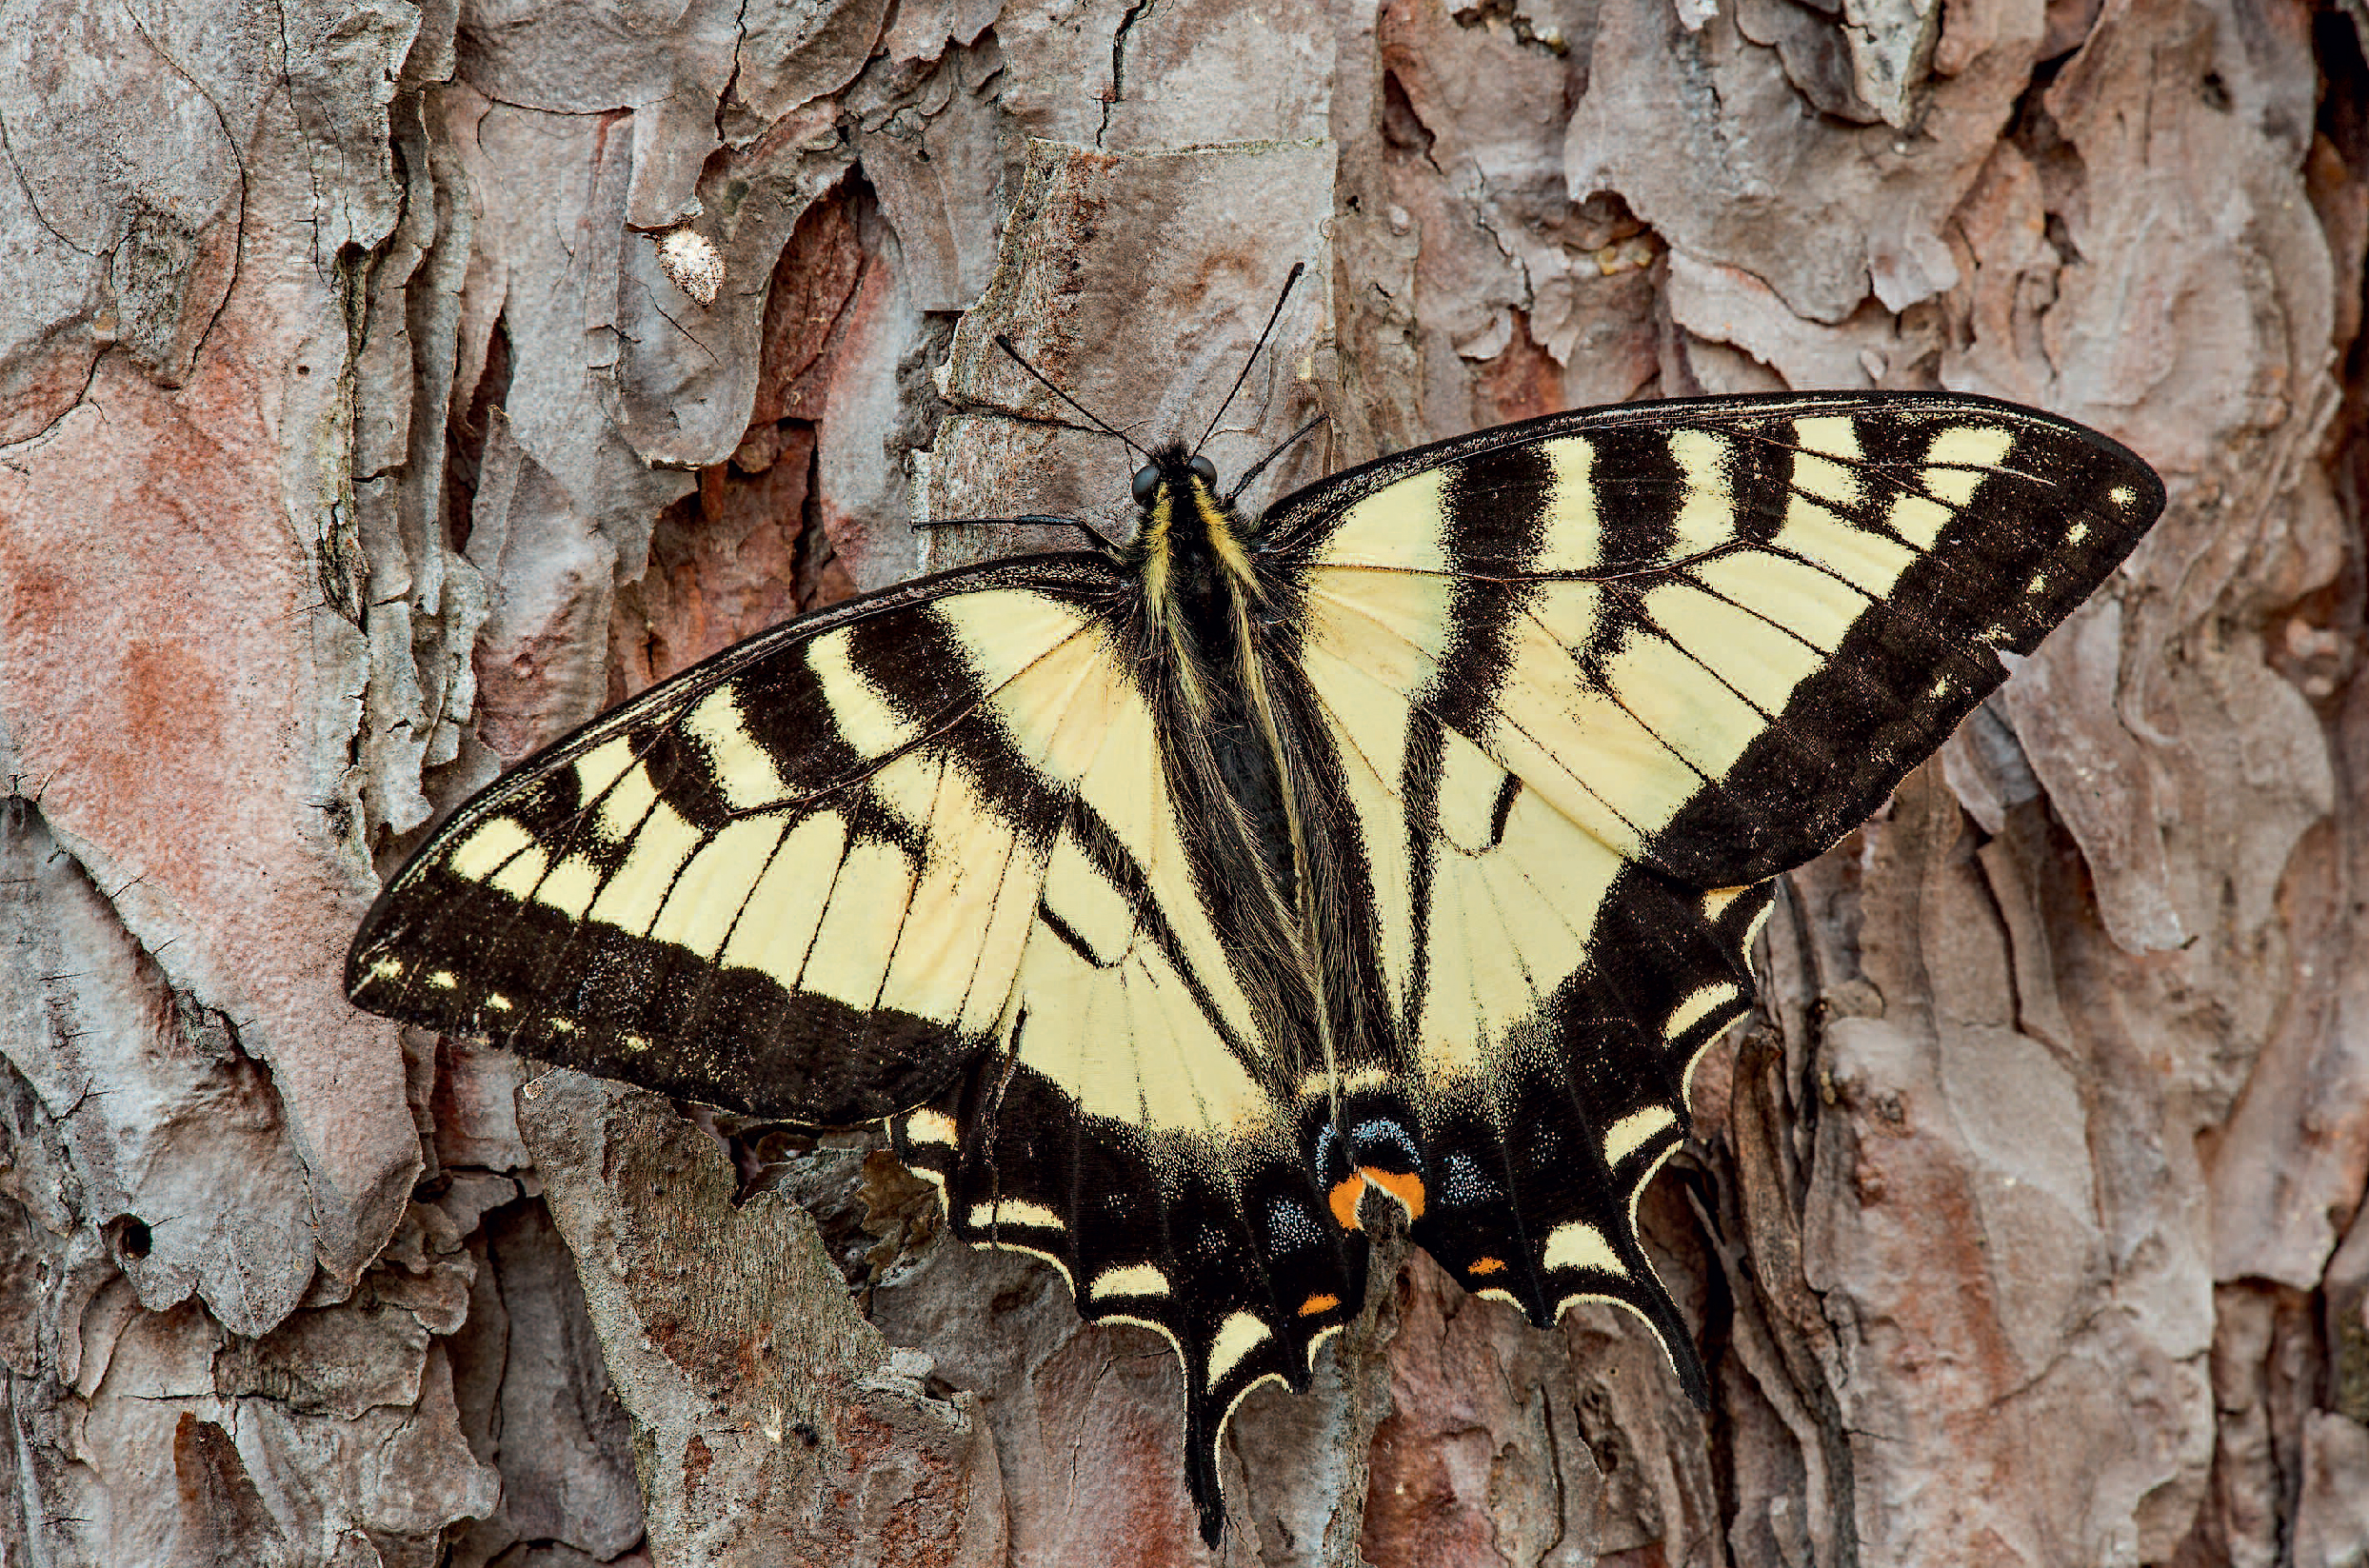
Eastern Tiger Swallowtails fly in the spring and are gone by mid-summer. Why this individual is roosting on the trunk of a pine tree during our Michigan fall color photo workshop remains a mystery. The butterfly is 5 feet up a tree, so a borrowed Sigma 180mm macro lens that has image stabilization is used along with fill-flash to capture a sharp image handheld. Canon 5D Mark III, 180mm, 1/60, f/11, ISO 400, Cloudy, fill-flash.
FASTER MACRO LENSES
Modern macro lenses often have apertures of f/4 or f/2.8. Why does this matter when we’ve already counseled you to consider f/18 as a good compromise between sufficient DOF and softness-inducing diffraction? Here is the reason: Most likely you’re not going to shoot at those wide apertures. You’re still going to shoot at f/18 or thereabouts most of the time. It’s just that those big and bright apertures are marvelous for clear viewing, for easy composing, and especially useful for quick and precise manual or autofocusing which is so crucial in close-up photography. Remember, the lens aperture doesn’t actually stop down to the shooting aperture until you push the shutter release. Even though the aperture is set to f/18, you still see the subject at the widest aperture on the lens.
IMAGE STABILIZATION
Canon may call it IS (Image Stabilization) and Nikon may call it VR (Vibration Reduction) and others may call it something else—the name of your stabilization system is unimportant. What’s important is that they’re a tremendous benefit to the handheld shooter. The systems typically cause internal lens elements to physically move in a manner that compensates for camera movement—not subject movement—and aids in producing sharp images for the handholder. An old rule of thumb is that the minimum shutter speed for handholding is the reciprocal of the lens focal length. For example, if using a 100mm macro lens, the minimum shutter speed would be 1/100 second. If your manufacturer claims your stabilization system offers a 4 stop improvement, you could presumably handhold 4 stops below 1/100 second, which is 1/6 second. Please recognize the possible presence of marketing puffery, and always test your own equipment to learn its limits. One way to check a stabilization system is to tack a magazine page to the wall and shoot the fine print while handheld with the stabilization system turned on. Find the lowest shutter speed at which you can repeatedly achieve sharp images. My own testing of a Sigma 180mm image-stabilized lens has proven that stabilization is a very valuable aid in handheld shooting. I was able to shoot acceptably sharp images handheld at 1/100 second with the 180mm lens, but could not do so at slower shutter speeds because I am super critical about sharpness. Still, being able to use 1/100 second is an enormous advantage for handheld photography.
Even with stabilization, it always pays to shoot at the highest shutter speed that is reasonably feasible, especially at higher magnifications where camera shake is magnified as much as the subject is magnified.
FLASH
Flash is a great aid in shooting sharp images. The flash duration will probably be less than 1/700 second and will produce a very sharp image when the lens is precisely focused on the subject. The key to shooting sharp handheld images is to ensure that all useful factors are employed for every shot:
✵Use a high ISO to allow a fast shutter speed.
✵When using Manual exposure, set the ambient light exposure about 1 stop underexposed to allow a contribution from the ambient light. This will help avoid black backgrounds.
✵If the ambient light is changing rapidly, then use the Shutter-priority exposure mode to lock in the shutter speed that is needed for sharp results. Some cameras even allow the shooter to lock in both the shutter speed and the aperture while allowing Auto ISO to adjust up or down for changing ambient light conditions. This works incredibly well for all handheld and low light photography.
✵When using any automatic mode, set the exposure compensation to slightly underexpose the subject.
✵Use your LCD display to confirm the desired exposure compensation.
✵Now use flash as the main or key light and set whatever flash exposure compensation (FEC) is necessary to produce an optimally exposed final image.
✵Be sure to use your RGB histogram to ensure proper exposure. Check to see that no color channel is seriously overexposed.
✵Set the shutter speed at or below your camera’s maximum sync speed if you’re not using a high-speed sync mode. Most likely you won’t accidently try to shoot with too fast of a shutter speed because your camera will likely detect a flash being used and automatically defaults to the sync speed for flash. By the way, although high-speed sync does make the flash less powerful in lighting the subject, it works well in close-up photography because flash to subject distances are short.
✵What is the key advantage of using flash as the main light? The short flash duration will freeze and render the subject sharp during its portion of the exposure. If the ambient light portion of the image is slightly soft due to camera shake or subject movement, it might not be as objectionable as it would be if the image consisted totally of a slightly soft ambient light exposure.
✵When all camera parameters are set to your satisfaction, ensure that your plane of focus is parallel to the most important plane of your subject and that your stance is balanced and steady with elbows firmly to your sides. Hold the camera just as still as possible, inhale a big breath, exhale part of it, hold it there, and gently and smoothly release the shutter.
✵Shoot as many images as possible to better your chances of perfect sharpness, but don’t shoot any faster than your flash can recycle for another shot.
✵Many will choose to shoot using ambient light only. In this case, activate image stabilization if you have it and use ISO 800 or perhaps ISO 1600—if necessary. Don’t stop down as much—perhaps f/8— and align the plane of focus carefully with the most important plane in the subject. Use the same camera holding strategy as just described earlier, and shoot a lot of images. As a minimum shutter speed, try to keep the shutter speed to at least 1/focal length of the lens.
✵Although we greatly prefer using manual focus when shooting on a tripod, automatic focus makes perfect sense when handholding. Your shooting distance will change slightly and continuously as you handhold. Using continuous autofocus to adjust for this does help capture sharp images. Although we normally use autofocus on the back-button for tripod work, putting the autofocus on the shutter button for handheld photography may be easier for most shooters. Why? There is one less thing to do as the button on the rear of the camera does not need to be held down when autofocus is relegated to the shutter button, which is the camera’s default.
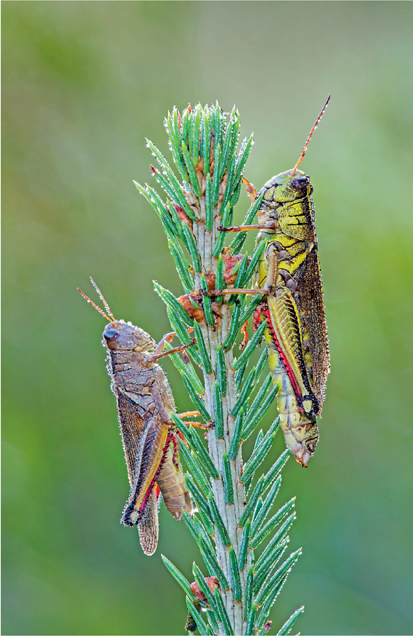
It pays to spend the time working wonderful subjects. These two grasshoppers, although dew covered, were not frozen in place. They crawled up and down this conifer twig. After several minutes, the two paused in the perfect position so both could be sharply focused. Canon 5D Mark III, 180mm, 1/1.7, f/20, ISO 100, Sun, fill-flash.
DIGITAL IMAGES ARE FREE
Well, sort of free anyway. The premise assumes that you have forgotten the initial cost of cameras, lenses, your vast collection of accessories, and computer costs! After all, you already own the gear, so does it matter economically how many pictures you shoot? The reasonable answer is no. So, good reader, when you’re pursuing the bewitchingly beautiful butterfly, don’t skimp on the number of images you shoot. Later, in the leisurely comfort of the evening, you can sort the good from the not-so-good—retaining only those super-sharp keepers that generate an involuntary “Wow!”
Oh, one more thought—we don’t use camera straps when shooting on a tripod and generally counsel our students to avoid them for several reasons. But they are valuable for steady handheld camera support.
Handheld photography of free-flying butterflies takes some thought and some practice, but is certainly possible. Which reminds me that even that one annoyingly skeptical student of ours reluctantly admits that diligently applying the guidelines we’ve covered here can make one’s success rate improve by leaps and bounds.
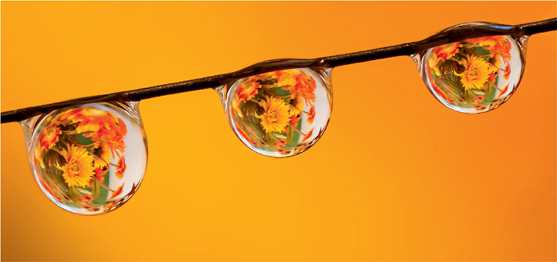
Barbara discovered horsehair has a surface texture that enables water drops to readily cling to it. Shooting indoors to avoid all air movement, she placed the water drops on the horsehair with an eyedropper. Then she placed a potted flower a few inches behind the water drops. Reflections in water drops are instantly appealing. On dewy mornings, always look for reflections in the natural dew drops! Nine images were combined with Zerene Stacker to acquire the depth of field needed to do justice to this tiny subject. Canon 5D Mark III, Canon 65mm macro, ISO 500, f/8, 4 seconds, Cloudy WB.
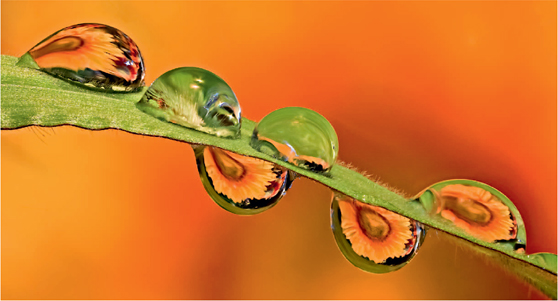
Barbara added water drops to the grass and placed some flowers closely behind them. Although she normally shoots Nikon, she borrowed my Canon camera and 65mm macro lens because it is optimized for high magnification. Barbara shot sixteen images using a Kirk focus rail to change the focus from the front to the rear of the subject in tiny increments. When shooting images at life-size magnification or greater, the focus rail is the optimal way to change the focus. The sixteen images were combined with Zerene Stacker in order to achieve a depth of field not possible with a single exposure. Canon 5D Mark III, Canon 65mm macro, ISO 400, f/9, 2.5 seconds, Cloudy WB.
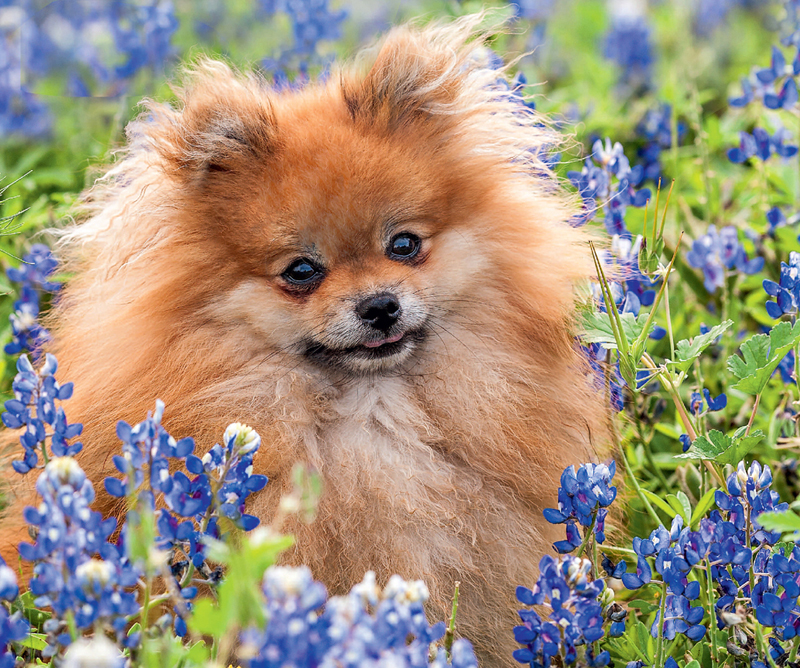
No book is complete unless Boo makes an appearance, according to Barbara. Nikon D3, 200mm, 1/320, f/8, ISO 400, Cloudy, and Aperture-priority.