Close Up Photography in Nature (2014)
3
Shooting Sharp Images
The wonderful magic of close-up photography is largely due to the vast array of colorful and interesting subjects so readily available and so willing to pose for you. You can easily find great subjects in gardens, fields, wooded areas, lakes and streams, and in lovely wet meadows on calm and dewy mornings. The possible subjects are innumerable.
Most subjects allow you to approach within camera range without being disturbed, but it can still be challenging to shoot sharp close-up images because one’s camera handling techniques must be nearly flawless. Why, you ask, is it so important? The image-psychology experts tell us that a viewer’s eye is first irresistibly drawn to the brightest and highest contrast areas of an image, but is next drawn to the areas of sharpness. If the subject isn’t sharp, the viewer’s eyes will not see the subject as you intended it to be seen. For most images to be effective, sharpness is critical. To ensure that your image is as sharp as you can make it, you should:
FOCUS PROPERLY—MANUAL FOCUS IS PREFERRED
✵Carefully select the correct plane of focus for the chosen subject.
✵Focus with care and precision, perhaps employing a magnified Live View image to help manually focus accurately.
✵Ensure adequate depth-of-field by choosing a proper aperture.
✵If available, use a tilt lens.
REDUCE CAMERA MOTION AND ITS EFFECTS
✵Securely mount the camera on a very sturdy tripod.
✵Use mirror lock-up.
✵Use a remote release or the self-timer to trip the shutter.
✵Use a sufficient shutter speed.
✵Use a short-duration burst of flash as the (main) key light.
REDUCE SUBJECT MOTION AND ITS EFFECTS
✵Use a fast enough shutter speed.
✵Use a short-duration burst of flash as the main light.
✵Have enough patience to wait for the wind to die down.
✵Have ample patience to wait for the subject to settle.
USE FOCUS STACKING
✵Employ this sophisticated but easy shooting and post-capture processing system to achieve very large depths-of-field.
Wow! So much to remember! Not to worry, though, as we are going to expand on all of these techniques. One day they will be a routine part of your shooting workflow and just come naturally whenever you shoot. You’ll be rewarded by images every bit as sharp as your best lens can produce. Another great benefit is that when the mechanics of sharp images have become second nature, your mind will be free to think about finding more of those splendid subjects!
TRIPODS
WHY BOTHER WITH A TRIPOD ANYWAY?
Many photographers, newbies and oldies alike, insist they have no need for a tripod because they can handhold much better than ordinary people! That claim is probably way off base for most overconfident shooters. It’s an incredibly bad idea for those doing close-up work, and it ignores the important ability to use the tripod as an aid to composition. More than one photographic educator has written that a good tripod is the most important accessory a photographer can own, and we agree. So, let’s explore the ins and outs and the whys and wherefores of tripods and tripod usage.
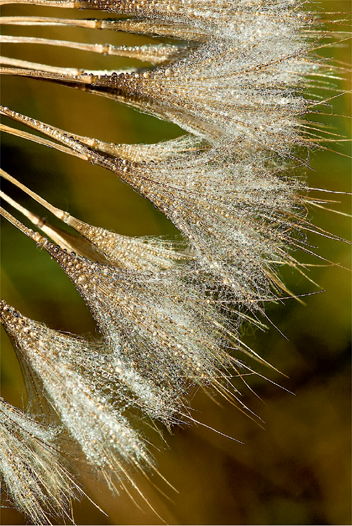
A sturdy tripod is enormously important for the majority of close-up images, such as this section of a Goat’s Beard seedhead. The small apertures that are required to obtain adequate depth-of-field and the light loss that is inherent in close-up lenses and accessories usually forces the use of shutter speeds that are far too slow for handheld shooting. Nikon D70, 200mm, 1/30, f/22, ISO 200, Auto.
HIGH MAGNIFICATION
Good close-up photography often involves high magnification. At high image magnifications, the image-softening effect of camera movement is magnified, too. In close-up work, the slightest camera movement can cause unsharp images.
When magnification is increased, depth-of-field declines markedly. At a magnification of 1x or life-size magnification, the DOF may be only a few millimeters. That’s true even at f/16. A millimeter is only about 1/25 of an inch, the mere thickness of a matchbook cover. In close-up work, limited DOF can cause unsharp images because the available DOF cannot adequately cover the depth of the subject.
Small apertures are necessary to obtain more depth-of-field. These small apertures demand longer shutter speeds. Apertures of f/16 and f/22 may involve shutter speeds as slow as 4 seconds and possibly longer. This is especially true if you are working under the soft light of a cloudy day, or using a diffuser, or shooting in the shade. These longer shutter speeds make your situation more susceptible to any movement of subject or camera, whether wind-induced or self-induced. In close-up work, increased DOF can indirectly cause unsharp images due to diffraction when small apertures are used.
LOCK IN THE COMPOSITION
Close-up images require a careful and thoughtful composition. Even a miniscule bit of wobble while shooting handheld will radically change the composition from shot to shot because the magnification makes the subject bounce all over the viewfinder.
A THIRD HAND
The most expert close-up and macro shooters working today regularly rely on light-modifying devices—diffusers, reflectors, flash—to skillfully improve the light on their small subjects. If one hand is needed to trip the shutter with a remote release and the other must hold the light-modifying device, then no hand is available to hold the camera.
AN AID TO MANUAL FOCUSING
The best and most precise way to focus on most close-up subjects is to do it manually. While it is tempting to look through the viewfinder to achieve sharp focus while the focus ring is slowly and manually turned, it really is more efficient to use Live View and magnify the specific part of the subject where the sharpest focus is desired in order to achieve the best focus. This is especially true for shooters over forty years old!
TRIPOD REQUIREMENTS AND POPULAR BRANDS
If you look through our tripod references in this book, and for that matter in all of our books, you will see we are always talking about good tripods and sturdy tripods. Those are not merely casual references, but important suggestions that are worthy of an explanation. Here they are:
The tripod must solidly support the camera and lens. A 200mm Nikon micro lens or a zoom lens mounted on a camera is a heavy combination. Make certain the tripod is properly rated for that load. Everybody yearns for a light tripod, but a tiny cheapie tripod that is too light and has wiggly legs, wobbly joints, and a plastic head is worthless for shooting sharp images. If you have one, use it to hold a flash, reflector, or Plamp instead, but certainly not your camera.
With legs extended, the tripod should be tall enough to put the camera viewfinder at or above eye level. It’s tough to spend a day bending over to see through your viewfinder. Lots of nice macro subjects are tall and you certainly don’t want to be extending a center column that merely converts your sturdy tripod into a far less stable monopod. Barb and I much prefer tripods characterized as a “set of legs” with no center column whatever. Of course, a very short center column of a few inches might be handy for fine-tuning your composition.
Countless enchanting macro subjects are very close to the ground. Your tripod must have legs that splay out flat to the ground. Generally, you want to shoot horizontally at the subject, not down at it. A tripod suitable for ground level operations, without using a cantilevered beam, is virtually essential for close-up nature photography. And, do ignore the oft-stated but absolutely useless suggestion that you mount your camera upside down on an inverted center column! I could do it that way when I was twenty, but seeing anyone do it now makes my neck ache.
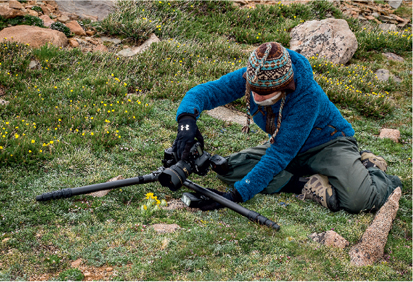
Barbara’s tripod legs are spread out to get low to the ground to photograph this Alpine Sunflower. She uses the 2 second self-timer to trip the shutter and a wireless main flash to enhance the colors in the blossoms and separate the flower from the background. Canon 5D Mark III, 24-70mm lens at 55mm, 1/10, f/18, ISO 200, Cloudy.
Tripods typically have three or four leg sections. All other factors, such as overall height, being equal, I much prefer the three-section legs because they are so much easier and quicker to set up and take down. Oblivious to my advice, Barbara selects four-section legs because they collapse to a shorter overall length, are easier to pack, and most elevate the camera higher. There is no wrong answer here as it’s a matter of personal preference.
Fine tripods are manufactured by Benbo, Gitzo, Induro, Really Right Stuff, and other companies. Everyone has their favorite model, and arguments are common. We use Gitzo tripods exclusively and have for many years. Gitzos are not inexpensive, but for decades they have been the “gold standard” tripods for outdoor and nature photographers. We recommend the carbon-fiber tripods because they are lighter and strangely sturdier than their aluminum counterparts. Aluminum tripods are less costly and perfectly satisfactory, too. So, our favorite tripod is a carbon-fiber Gitzo with no center column, collapsible to about 27 inches and able to reach about 59 inches when extended. The models we use—#1325 and GT3541LS—are no longer made, but plenty of upgraded versions are available. For a similar version, look at Gitzo’s Systematic line of tripods such as the GT4330LS and the GT3330LS.
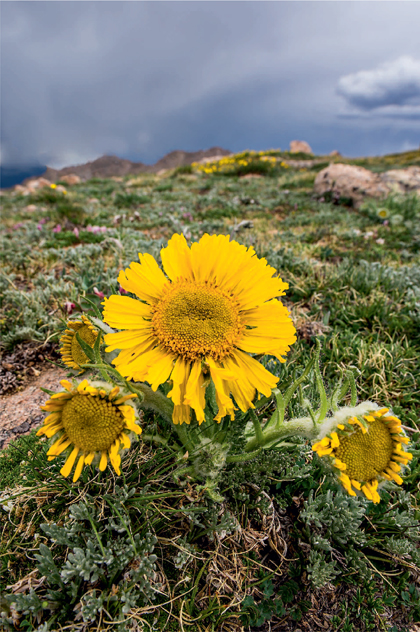
Here’s the Alpine Sunflower Barbara is shooting in the previous image. She focused a 24mm lens close to the flowers to make them large in the image while also capturing the background. Nikon D4, 24mm, 1/20, f/16, ISO 200, Cloudy, +1/3 flash compensation.
TRIPOD HEADS
Every tripod must be topped by a head. It is the head that provides the smooth and easy adjustment of camera directions and angles that allows your desired composition. An easy to operate head that securely locks your camera and lens into the most favorable position is essential to convenient close-up photography. I promised you honesty, so here is a bit of it: There are a zillion different tripod heads on the market ranging from dreadful plastic grip heads to shabby one-way adjustment heads. However, there are only two suitable for close-up photography. They are the ball head and the one called a “pan-tilt head” or “three-way head.”
THE THREE-WAY PAN-TILT HEAD
This head has pros and cons. The pro is that it has independent handles for vertical, horizontal, and angular movements, which airplane pilots call pitch, yaw, and roll. The pan-tilt head allows greater precision of adjustment than the ball head. You can more easily adjust the camera in one direction without accidentally disturbing the other directions. But! The pan-tilt head has two cons. One is that having to wrap your mind around three controls instead of the one control of the ball head is awkward to many users. A second problem for us and many others is the three handles are always in the way and poking us in the eye. We know users who like them, but most nature and close-up shooters avoid them. In fact, Al Hart, our consistently intractable rebellious student, steadfastly touted and used pan-tilt heads for decades while haughtily citing their greater precision. Nonetheless, just this past year, he finally saw the light and switched to ball heads and is glad he finally did so.
BALL HEADS
Ball heads are efficient to use with only one main control knob. The other smaller knobs are used less often. Ball heads have no long handles poking you in the eye, either! There are many makers of ball heads. As with most things, cheap ones are cheap and good ones are expensive. You get what you pay for. Barbara and I have for years used the excellent ball heads made by Kirk Enterprises (www.kirkphoto.com). Kirk makes the larger BH-1 and a smaller BH-3. They are well-suited for close-up work, and we have used both successfully. Fine ball heads are also offered by other manufacturers, and RRS (www.reallyrightstuff.com) offers several splendid heads, the largest being the BH-55, and many outdoor shooters swear by it. There are other ball heads, but we rarely see them and therefore won’t comment on them.
The ball heads made by Kirk, RRS, and some others feature a built-in clamp to accept the camera plates and lens plates commonly used these days. These clamps and plates are of the “Arca-Swiss” type, the present-day gold standard of camera mounting systems. Several manufacturers offer camera-mounting and lens mounting plates that are compatible with the Arca system, which remains by far the most popular among serious photographers.
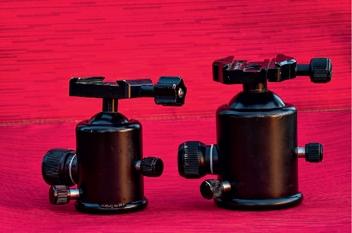
For twenty years, we have used Kirk ball heads exclusively and remain perfectly thrilled with them. They are easy to use, reliable, and sturdy. The Kirk BH-3 ($285) is the smaller one on the left. The larger one is the BH-1 ($385). For close-ups, the smaller ball head is fine. However, if you wish to use larger lenses on the ball head—500mm f/4 lens for example—then you need the larger Kirk BH-1.
There is another advantage to the Arca system that is especially handy for close-up shooters. One can equip a camera or a lens with an especially long Arca mounting plate. They can then slide the camera and lens back and forth within a slightly loosened Arca clamp to use the Arca parts as a miniature focusing rail. Compositions and ease of focusing are greatly improved at no additional cost!
LENS PLATES
Some lenses, including the Canon and Sigma 180mm macros and the Nikon 200mm micro, have a built-in tripod collar to which you can easily attach an Arca lens plate. The camera is attached to the lens, but the lens and not the camera is attached to the tripod—an arrangement with many pluses:
Important: The camera and lens are better balanced on the tripod, reducing camera movement.
Also important: The load on the camera’s lens mount surface is greatly reduced, lessening the potential for camera damage.
A biggie: The entire camera and lens can be rotated between horizontal and vertical vastly more easily than by any other means. Going back and forth is quick and easy. It is equally easy to shoot at any angle in between horizontal and vertical, too. Easy changes in composition make for many better images!
A caveat: There are some “universal” camera and lens plates available. They fit everything, but often poorly. We don’t recommend any of them. A poor quality camera or lens plate not properly gripped by the Arca clamp can mean a camera and lens shattered on the rocks below!
A recommendation: The camera and lens plates made by Kirk Enterprises, RRS, and Wimberley feature perfect Arca-system compatibility, superb machining, and are competitively priced with each other. A phone call to any will get you excellent advice.
DEDICATED L-BRACKETS
A dedicated L-bracket is designed especially for a particular camera. Most popular cameras have one made for it. This accessory should be attached to every camera that is used on a tripod. The L-bracket attaches to the camera’s bottom by a screw that engages the camera’s tripod socket. It provides an Arca-style plate on both the camera bottom and the camera side, while the dedicated design allows convenient battery and cable access.
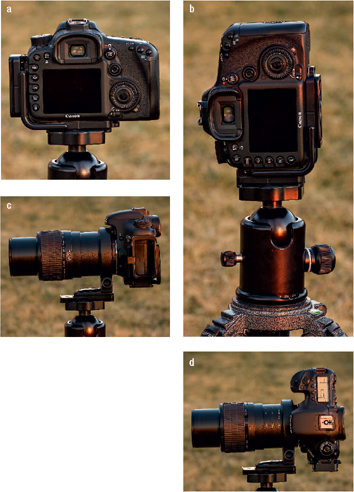
No matter what tripod head you use, make sure it can accept the Arca-Swiss style plates because many manufacturers make accessories for this style which provides plenty of choices. It is far easier to shoot close-ups if you do not have to flop the camera over to the side to shoot a vertical composition. All cameras benefit from the addition of an L-bracket. This screws into the bottom of the camera and provides a quick-release plate on two sides. In part a, the camera is attached to the tripod head horizontally with the L-bracket. In part b, the camera is mounted to shoot a vertical (portrait) composition by attaching the camera to the tripod head with the other quick-release plate on the L-bracket. L-brackets work incredibly well when shooting with lenses that don’t have a tripod collar. If your lens has a tripod collar, then attach the collar to the tripod head with a quick-release plate and shoot horizontally (part c), vertically (part d), or any angle in-between by simply loosening the tripod collar, rotating the lens to the desired angle, and tightening the collar.
The purpose of the L-bracket is to allow quick and easy changing between horizontal and vertical shooting with lenses that aren’t equipped with tripod collars, such as the very popular 100mm macro lenses. Yes, very convenient for those macro shooters, but equally convenient with any lens whatsoever without a tripod collar. Not only providing convenience, the dedicated L-bracket allows switching between vertical and horizontal shots with no need to twist the tripod head into vibration prone unstable configurations that misplace the center of gravity, and there is no need to lower the viewfinder into a position needing a lot of bending over. Macro shooters have plenty of headaches—no need for backaches, too. A dedicated L-bracket is a splendid accessory. Get one forthwith!
TRIPODS, THE ENVIRONMENT, AND CAMERA STEADINESS
Absolute camera steadiness being so crucial in macro shooting, Barbara and I always counsel our students to use a good tripod with a good ball head whenever possible, to use an L-bracket, and to use a lens plate on appropriate lenses. Yet, in spite of these precautions, trouble is possible. Trouble in the form of image-destructive camera shake can come from:
1.Wind
2.Water
3.Soft ground
4.Firing the camera
Let’s look at each.
WIND
Winds of 10 mph or more will surely cause vibration of the tripod legs that will be transmitted to the camera itself. The fix is to await calm conditions, a temporary lull in the wind, or perhaps to move to the downwind side of a hill, cliff, boulder, forest edge, nearby vehicle, or some other wind boulder, forest edge, nearby vehicle, or some other wind-obstructing obstacle. Perhaps even a large reflector or diffuser will help, used not to modify light but to block the breeze.
High winds, heck, even gentle breezes are particularly nettlesome when shooting close-ups. Even slight breezes can be ruinous, and in over forty years of macro shooting, I have capitulated to a steady breeze on thousands of potentially memorable images. Wind is the most common and persistent obstacle Barbara and I face each time we photograph.
We live amid high mountain slopes near Yellowstone National Park. Even on calm weather days when there is little wind, air tends to slide up and down the mountain slopes. Still air doesn’t happen often enough at our home. Rather than wait for perfectly calm conditions to occur, we have built a small greenhouse on our property. When all of the doors and windows are closed, the air is always still inside the greenhouse. Now we can shoot sharp close-up images of the plants we grow anytime we want to.
The greenhouse not only blocks all wind, but allows easy manipulation of the light, keeps mosquitoes at bay, provides handy shelves for our photo gear, and comforts us against rain. Barbara and I enjoy the many benefits of the small greenhouse we had installed at our home. If the wind allows, we often open a window and shoot our macro subjects against the lovely green backgrounds of surrounding meadows. Although an expensive addition ($2000 to $5000), it can surely be a boon to the serious shooter. We regret not having done it years ago. Relatively inexpensive portable versions may be just what you need.
WATER
The wonderful waterfall shot made from the middle of the stream subjects the tripod legs and hence the camera to the considerable vibration brought on by the action of the running water. It is better if you can set the tripod feet behind rocks or logs which obstruct the water’s vibrating flow. In a pinch, use your own foot to block the flow.
Are we crying wolf? Check us out by setting your tripod and camera in a flowing stream. Use a 5x or 10x magnified Live View to look at the subject. If the flowing water is vibrating the tripod at all, the subject will be gyrating around like it is in a severe earthquake.
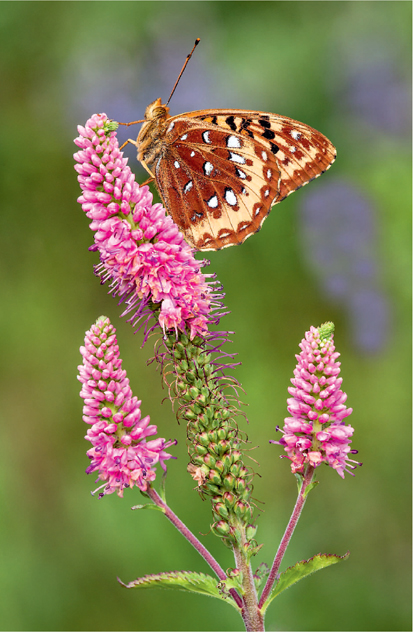
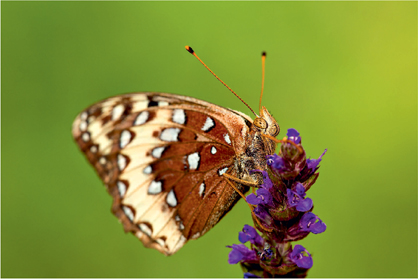
This handsome male Great Spangled Fritillary is in excellent condition. The butterfly perching quietly on this flower is a great subject. The situation is perfect with the soft early morning light, a cooperative subject, and no breeze. While using superb technique, I quickly shot a pleasing image before the butterfly crawled to an unfavorable spot on the flower. Here’s the key to shooting excellent images consistently. Find an excellent subject in an excellent situation and use excellent technique. Canon 5D Mark III, 180mm, 1/25, f/11, ISO 200, Cloudy, and a weak main flash.
SOFT GROUND
Sand, mud, and snow will bog down your car, and the same elements can be the ruination of close-up shooters. If the ground moves so much as a silly millimeter, a macro subject can go significantly out of focus. So when shooting a frog in a foggy soggy bog, remain very still and don’t even move your feet. Don’t shift your own weight, and be alert for wiggly wobbling nearby persons walking past who can shake the ground from afar.
FIRING THE CAMERA
Consistently sharp images require precise focusing and completely motionless subjects and cameras!
Make certain you not only understand the above sentence, but are willing to do everything you possibly can to make it your rule for every shot! It’s especially true when not getting the benefit of the short flash duration of an electronic flash. Unfortunately, a high percentage of beginning and even advanced shooters will shoot when the subject is nearly still, but not completely still, or the camera is permitted to move. Let’s discuss the shooting habits that deliver sharp images time after time.
USE A REMOTE RELEASE
In the old days of mechanical cameras, we called them cable releases. In today’s world of electronic cameras, they are better called electrical releases or remote releases. The purpose of a remote release is to allow shutter activation without causing camera motion that would be created if you pressed the shutter button with your finger. There are several types of releases. The simplest and least expensive is merely a push-button switch attached by an electrical wire to a connector that fits into the camera. The camera is mechanically isolated from the push of the button by the flexibility of the wire. Another inexpensive type is a small pendant that sends an infrared beam to an infrared sensor with which some cameras are equipped. Isolation here is by the absence of a mechanical connection between the shutter release button and the camera.
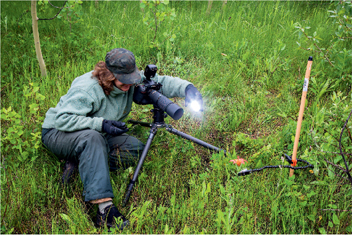
Barbara uses a cable release to trip the camera’s shutter. When shooting close-up images, never trip the camera with your finger—unless using the 2 second self-timer—to separate your quivering finger from the camera to achieve the ultimate in sharpness. Notice the Nikon wireless flash controller that is mounted in the camera’s hotshoe. The Plamp is being used to stabilize the lily without harming it. Canon 5D Mark III, 24-70 zoom at 47mm, 1/6, f/18, ISO 100, Shade.
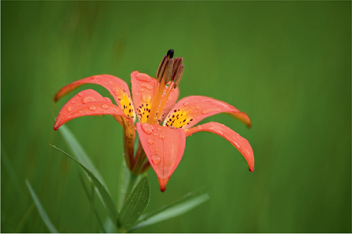
Here’s the lily Barbara is photographing. Notice how the distant background is rendered nicely out of focus even when stopped down to f/16. Barbara used a magnified Live View image to manually focus on the protruding stamens. Nikon D4, 200mm, 1/3, f/22, ISO 100, Cloudy, fill-flash.
Complete mechanical isolation is also accomplished wirelessly by a radio link system. Radio links are especially good for activating the camera from a great distance, around corners, or behind obstacles. Typically, a radio system includes a remote transmitter and a local receiver that is attached to the camera by a short cable. A few years ago, we began using radio systems manufactured by Pocket Wizard. Though not inexpensive, they are highly regarded by the professional photographer community for being very effective and reliable. However, during the last year, I have abandoned the Pocket Wizards in favor of my radio-controlled Canon 600 EX-RT when used with the ST-E3-RT hotshoe controller. It works terrifically well! I enjoy being able to fire my camera from a distance by pressing the release button on the flash.
Be careful, though, when using any system with a lock that provides continuous shooting. Should the lock be inadvertently set, a situation that we encounter at least once a day in a photo workshop with one of our clients, control of the camera is temporarily lost. It isn’t a big deal with digital once you discover the release is locked, but in the film days, many a hapless victim suffered the loss of a complete roll of expensive film before reacting to shut it off!
SELF-TIMER
Another effective way to fire the camera with reduced camera motion is to use the built-in self-timer. Generally, the default setting for the camera’s self-timer is a time delay of 8 or 10 seconds. This allows the photographer to fire the camera and then run around and get into the picture. However, this much time is altogether too much delay for merely isolating the camera from any vibration the camera might have when the shutter button is pushed with a finger. So, if your camera permits (and most do), change the self-timer to 2 seconds or so. Then fire the camera, no, not by pushing the shutter button, but instead by carefully rolling your finger over the shutter button. A rolling finger motion induces less camera vibration than an abrupt jab of the finger and should always be used when directly firing the camera.
If the subject is in motion, such as a flower in a breeze, the 2 second timer method fails because there is no way to accurately predict that the flower will be motionless 2 seconds later. Here, a remote release is more effective. If you forgot your remote release, you could try multiple attempts at catching the peak of stillness with the 2 second delay. Better yet, don’t forget the remote release, especially if your luck is similar to mine.
MIRROR LOCK-UP
Mirror vibration can also be a cause of fuzzy images, but I have covered the gist of it back in Chapter One. I won’t bore you with going over the same ground again, but I will nag you to the extent of reminding you about the critically important issue of camera stillness when shooting macro images. Be sure to use mirror lock-up whenever appropriate!
LIVE VIEW
Like mirror lock-up, Live View was covered in Chapter One. Nonetheless, like mirror lock-up, Live View is another very valuable tool in ensuring the sharpest possible image when shooting close-ups. If your camera supports Live View, make sure it is prominent in your sharp shooting toolbox!
FOCUSING
Talented close-up photographers are successful only if they’ve adopted exemplary shooting habits—especially focusing. Remember that the depth-of-field of a medium focal length lens shooting at macro distances, say a Canon 65mm macro or a Nikon 60mm micro, can be, for example, as little as 2mm, which is less than 1/10 of 1 inch! With the depth-of-field so limited, it’s essential that the lens be precisely focused on the correct plane of focus. Be aware that unlike photography for larger objects where the depth-of-field falls roughly 1/3 in front of the object and 2/3 behind it, the DOF in close-up shooting is closer to 50/50 in front of and behind the plane of focus. Let’s see how to consistently obtain sharp focus.
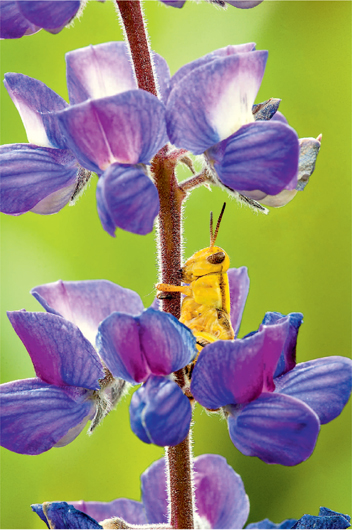
This yellow grasshopper is attempting to hide in the midst of the lupine blossom. This flower could not be stabilized with a Plamp because that would scare the grasshopper. By carefully watching the live image on the LCD display, the image is shot when everything is perfectly still. Nikon D3, 200mm, 1/3, f/22, ISO 200, Auto.
AUTOFOCUS
Barbara and I use autofocus extensively in our landscape and wildlife photography, but rarely for close-up work. When autofocus is used, though, it is made far more useful by configuring the camera for “back-button focusing,” a technique we have touted extensively in all of our books, that we consistently teach at our seminars and workshops, and that is detailed at our web site www.gerlachnaturephoto.com in the articles section. Back-button focusing allows much greater freedom to select and use a convenient focus point and then recompose to produce and shoot the best image without unwanted refocusing. We heartily recommend that you visit our web site, read the details, and if your camera accommodates back-button focusing (most likely), do it forthwith! It occasionally takes a few shots to get used to it, but new users that quickly get used to it often wonder how they ever got along without it.
Even when using back-button activation, autofocus may not work well when doing close-up work. The subject may be closer than the minimum distance at which the autofocus will work, which is also a problem for manual focus as well. The biggest problem is the desired focus point may have inadequate contrast for the autofocus system to operate accurately. This causes the system to continuously search back and forth without finding proper focus. Also, the extremely limited DOF in close-up work requires you to precisely focus on the most important part of the subject. Most of the time, no single AF point corresponds to the exact spot where the sharpest focus is desired.
MANUAL FOCUS
We wish it were otherwise, but autofocus just isn’t terribly useful for close-up work. Luckily, it’s easy to ignore autofocus and just manually turn the lens’s focus ring slowly while looking through the viewfinder and rocking the focus back and forth to see the point of best focus. Manual focus may be more difficult for those of you over forty (Barb and I are still thirty-nine—we wish), but practice does help.
The spring chickens among you and even you old timers with a zillion shots under your belt may encounter focusing difficulty when the viewfinder image darkens. Here, size does matter—at least the maximum size of the aperture. Viewfinder brightness is determined by the maximum aperture, not the shooting aperture, and the image from an f/2.8 lens is twice as bright as that from an f/4 lens. Extension tubes also cut down on the light, as do teleconverters and polarizing filters. One good method of dealing with dark viewfinder images is to use Live View if it is offered by your camera. I discussed Live View in Chapter One. Now we’ll just add a few details.
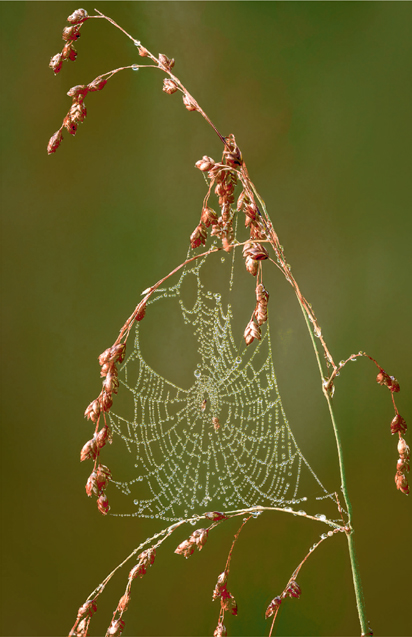
Photograph dewy spider webs at first light when the air is still. Once the sun begins to heat the atmosphere, moving air makes it impossible to capture a sharp image of this exquisite subject. Nikon D4, 200mm, 1/15, f/10, ISO 100, Shade, twenty-three images were merged into one image using Zerene Stacker to achieve incredible depth-of-field.
LIVE VIEW FOCUSING TECHNIQUES
Many newer cameras offer a Live View capability where the camera’s mirror is raised and the shutter is opened, so the image is seen on the camera’s rear LCD panel. Here, the composition and especially the focusing can be seen with great precision.
Additionally, the Live View image on many cameras can be magnified such that only a very small part of the image—the part where precise focus is wanted—can be selected and studied until it is in perfect focus. This feature provides even greater precision of focusing, a boon to all photographers and a super boon for us more mature folks! Moreover, our generally new gadget resistant rebellious student is nearing 80, and even he loves Live View for his macro work. He couldn’t do without it!
Like everything in photography, Live View offers many a benefit, but at a price. You pay for its precision and ease of focusing in reduced battery life, but carrying a couple of extra batteries with you solves that problem. Some say that the sensor’s temperature rise because of Live View usage will increase digital noise in the image shadows. One more problem is seeing the LCD image in bright sunlight. However, if you use a “Hoodloupe” (www.hoodmanusa.com), you will avoid the sunlight problem and probably never want to be without that gadget again!
Here’s how to use Live View:
1.Set your lens to manual focus.
2.Activate Live View.
3.Notice the scrollable box appearing on the LCD screen.
4.Move the box over that part of the image needing most critical focus.
5.Magnify the image as desired.
6.Carefully rock the lens’s focus ring back and forth for best focus.
Marvel at how easily you can get perfect focus!
If that seems like a lot of steps to remember, don’t worry, you won’t have to. Once you’ve done it a couple of times, it will merely be a simple sequence of things you naturally do when you want precise focus.
Not only can you get the best possible focus and hence the sharpest possible image with Live View, but you can easily see even the slightest movement of the subject. You can view your dandelion blossom or spider web in the Live View mode, watch the LCD, and release the shutter as soon as you see that your dancing subject has stopped wiggling in the breeze!
FOCUSING RAILS
This accessory is tremendously helpful when shooting magnifications at life-size and greater. In some circumstances, it may indeed be a necessity. The focusing rail is a device mounted between the tripod and the camera, or perhaps between the tripod and the lens—if the lens has a tripod collar. (If the lens does, be sure to use it!) The focusing rail uses mechanical gearing to move the entire camera and lens assembly forward and backward in very small incremental movements. Having achieved approximate focus by adjustments of tripod position and lens, the focusing rail is adjusted for the last little very precise achievement of perfect focus. Some focusing rails also offer side-to-side adjustability, which is sometimes an aid to very careful composition, though the Kirk rail we use only moves forward and backward. We recommend that if you do buy a focusing rail, don’t skimp on the quality. Only precision machining will do the job without annoying looseness or rough movements.
The focusing rail is incredibly useful for shooting sets of images where the focus between images is varied a tiny amount. The sets of images are combined into one final image where everything is sharp from foreground to background. This technique is called focus stacking.
OPTIMUM APERTURES
The lens aperture can have a significant effect on sharpness. Lenses that are wide open can suffer from various optical aberrations, and lenses that are stopped down too far suffer from others. To obtain the best sharpness, you should avoid using either extreme of aperture. In fact, most lenses offer maximally sharp images when stopped down about 2 stops from wide open. Your f/2.8 lens is probably sharpest at f/5.6 and your f/4 lens at f/8.
However, you can’t always shoot at f/5.6 or f/8 or any other given aperture. Sometimes, if not most of the time, you must use a smaller aperture—f/16 for example—that provides more depth-of-field. On the flip side, to isolate a subject against a background, you may need a very wide aperture such as f/4. In either case, do use that smaller or larger aperture, as the difference in sharpness by deviating from the optimum aperture is minimal. Smaller apertures are more problematic to use than the widest apertures. Often in shooting macro one needs to use a smaller aperture to achieve a needed depth-of-field. As one makes the aperture smaller and smaller to get that DOF, the lens aberration called “diffraction” becomes more and more prevalent and softens the entire image. Diffraction is caused by the bending of light as it goes through an aperture. The smaller the hole, the greater the diffraction. It’s a compromise between diffraction and DOF, but try to avoid the two smallest apertures of your lens. For example, if your lens stops down to f/32, then avoid both f/32 and f/22 and you won’t suffer much from diffraction-induced softening.
Focal length influences diffraction, too. The f/stop is a relationship between the focal length of the lens and the diameter of the aperture. A 200mm lens that is shot at f/22 has a larger physical aperture than f/22 with any shorter focal length. For example, my Canon 200mm macro will stop down to f/32, but my Canon 65mm macro only goes down to f/16. Neither lens offers any smaller apertures because diffraction would produce such soft images that everyone would complain. Regardless of the focal length of the lens, beware of using the extremely small apertures in the f/22 to f/45 range.
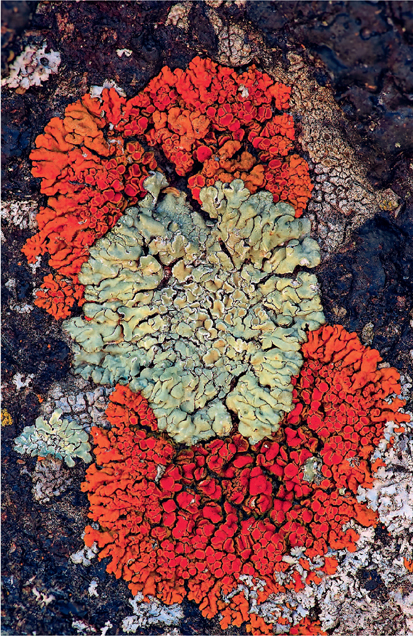
John photographed the lichen specifically to demonstrate diffraction for this book. He used 11 because it is a very sharp aperture on his Canon 180mm macro lens. Four images are shot where the focus is changed slightly and then this small stack of images is combined into a single image with Helicon Focus to simultaneously achieve both superb sharpness and plenty of depth-of-field. Canon 5D Mark III, 180mm, 1/4, f/11, ISO 100, Shade.
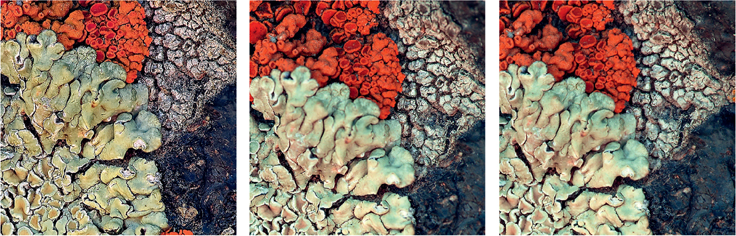
In part a, a highly magnified portion of the lichen is greatly blown up to clearly reveal the excellent sharpness. In part b, the enlargement is from a single image where f/11 is used. Notice some portions of the lichen are not sharp because the depth-of-field is inadequate at f/11. In part c, the overall depth-of-field is significantly improved by stopping down to f/32, but the overall sharpness suffers from increased diffraction at this tiny aperture. Prior to shooting this test, we would use f/18 to shoot the lichen in one shot. This is a compromise between more depth-of-field than f/11 delivers and far less diffraction at f/32. Now, we would use f/11 and shoot a series of images to be combined with focus stacking software to arrive at the super sharp result you see in the figure on page 79.
SHOOT A LITTLE LOOSER
Depth-of-field is inversely proportional to magnification. What on earth does that mean? Only that the greater the magnification, the less the DOF. If we shoot from a bit farther away, the lower magnification gives a greater DOF that may be just enough to make the subject sharp from front to rear. Later on in post-capture editing, we can magnify the subject by cropping it to the desired composition. Make sure you don’t carry this too far. Too much post-capture magnification and too few camera sensor pixels will cause a loss of adequate picture detail.
SUBJECT PLANE AND SENSOR PLANE SHOULD BE PARALLEL
The very shallow depth-of-field encountered in high-magnification shooting often makes it necessary to ensure that the most important plane of the subject is absolutely parallel with the camera’s image sensor. Although a crucial consideration, and one that is simple sounding, we find that many shooters either don’t appreciate its importance or somehow fail to make it happen.
Suppose we’re tramping through the flowery meadow early on a very cold summer morning. We spot a gorgeous specimen of a Great Spangled Fritillary perched on a flower, and this lethargic creature is so cold it’s totally dormant. It has spectacularly colorful wings that are neatly folded over its back. After a short study of how the wings are tilted, we carefully align the camera in a seemingly parallel position. But, are we perfectly parallel with the first attempt? Probably not!
If you were in those circumstances, how could you tell? Here’s how. Using a magnified Live View image of the wings, focus first on the wing at its point of attachment to the thorax. Then, move the Live View’s scrolling box to study the opposite edge of the wing. Is it also in focus? If not, you probably have a problem of non-parallel alignment, so readjust the camera position until both fore and aft of the wing are sharp. Continue to readjust the camera’s position in tiny increments until all parts of the wing, including the top and bottom edges, are all in good focus. Now you have a sensor parallel to the subject’s most important plane—the wings!
All that does seem burdensome, but having the sensor plane parallel to the subject’s most important plane truly does make the image significantly sharper. Although we described a simple subject like a butterfly, there are cases where the subject has no obvious plane of needed sharpness. The subject may even have multiple interesting planes, and you must decide which plane is most important. Focus as we just discussed, stop down to f/16 or f/18, and shoot! If the subject is perfectly still for minutes at a time, the focus stacking techniques will let you capture multiple planes in exquisitely sharp focus.
The Great Spangled Fritillary wings aren’t even close to being parallel with the camera’s sensor. The wings go out of focus rapidly at f/13. Canon 5D Mark III, 180mm, 1/20, f/13, ISO 160, Cloudy, fill-flash.
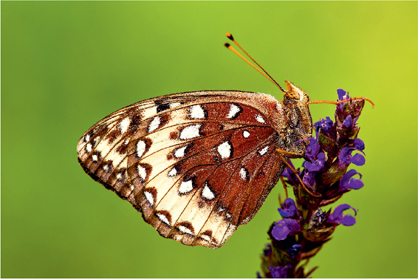
By repositioning the camera to make the sensor plane parallel to the plane of the wings, the depth-of-field easily covers this cooperative butterfly. Canon 5D Mark III, 180mm, f/13, 1/20, ISO 160, Cloudy, fill-flash.
KEEP STILL!
Trying to get a sharp image of a wildflower defiantly dancing in a baffling breeze can generally drive the most laid-back photographer into involuntary utterances of impolite language. Sure, one can up the ISO to 1600, set the aperture to f/4, hope for a lull in the gale, and perhaps get a sharp image. But, the image will likely suffer from insufficient depth-of-field and increased digital noise. Perhaps it is better to come back early tomorrow morning when there is no wind—hopefully!
Wildflower shooters favor calm air and bright overcast days. The overcast offers soft light, and the calm conditions are essential when shooting at slow shutter speeds, say 1/30 second and slower. In those conditions, you always should have:
LADIES AND GENTLEMEN: THE PLAMP!
Years ago, okay, decades ago, I employed a stiff wire with a clothespin attached to each end of the wire to brace my wavering and wiggling subjects. Yes, it was effective, but very crude and easily broken. I struggled with it for years until Clay Wimberley at (www.tripodhead.com) invented the Plamp. What on earth is a Plamp, you ask? The name is a contraction of “plant clamp,” and this $40 device is worth its cost many times over. It’s a sturdy and flexible photo tool about 22 inches long that holds its shape, but is easily bent. Each end has a spring-loaded clamp. It sounds simple, but it has a gratifying abundance of handy uses for the close-up shooter. The Plamp can be used to:
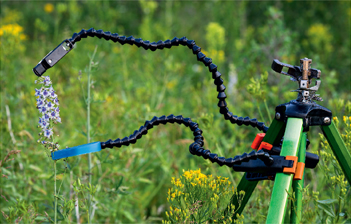
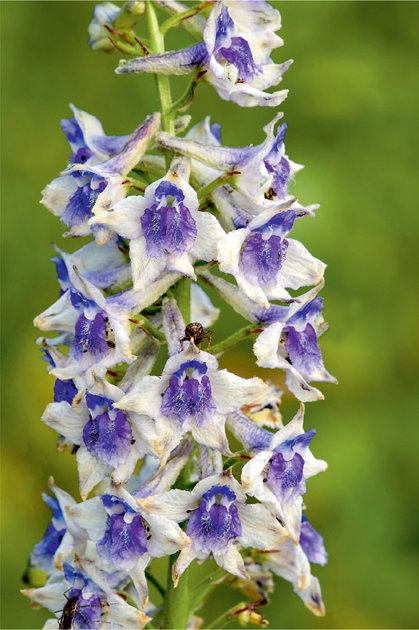
Using a tripod lawn sprinkler for support, two Plamps are attached to it and used to stabilize this delphinium wildflower by attaching one Plamp below the part of the flower that will be photographed and the other above it. We frequently use two Plamps at the same time to steady the subject. Plamps are so important to obtaining sharp images that we wonder why most close-up photographers don’t avail themselves of their enormous benefits. Canon 5D Mark III, 180mm, 1/4, f/11, ISO 100, Cloudy, fill-flash.
1.Clamp one end to a stake and the other to a plant to hold the plant still.
2.Hold and position a small reflector or diffuser.
3.Hold something in front of, or behind, the subject to improve the composition.
4.Tilt the subject to improve the composition.
5.Reposition the subject to achieve a better background.
Barb and I heartily endorse the Plamp and recommend that all close-up shooters have at least one, while two is better still. We each have three!
HOW TO HOLD A FLOWER STILL
Consider the larkspur. It’s a common mountain wildflower growing up to 3 feet tall and bearing blossoms up and down its tough stem. To shoot a sharp image of the blossoms, even in a slight breeze, attach a Plamp just above the blossoms to be shot and another Plamp just below. The other ends of the two Plamps are attached to a separate nearby tripod or to a stake pushed into the ground. We happen to favor plastic electric fence supports although any old stake will do. In a reasonable breeze, that clamping will permit sharp images even at very slow shutter speeds, although there is obviously still some limit on just how much breeze can be tolerated.
Careful placement of the Plamps prevents them from appearing in this image. Canon 5D Mark III, 180mm, 1/1.6, f/22, ISO 100, Cloudy, fill-flash.
PLAMPS, DIFFUSERS, AND REFLECTORS
The Plamp isn’t enormously strong, but can very easily hold small reflectors and diffusers, and larger ones too if one edge of the reflector or diffuser rests on the ground or some other support. If you run across a small group of flowers or mushrooms growing close to the ground and in bright sunlight, you can place your spare tripod or your friend’s tripod nearby and Plamp the diffuser to it. Absent a tripod, a simple stake will do. The diffuser is held in place by the Plamp and softens the sunlight, which lowers the contrast to produce a pleasing image. Moreover, you have both hands free to fire the shutter, hold the flash, slap a pesky mosquito, or scratch your nose—always itchiest when you’re busiest.
HOLDING AN OBJECT BEHIND OR IN FRONT OF THE SUBJECT
Creative close-up photographers like to occasionally mix and match colors in their images. Suppose you are shooting a bright yellow wildflower. Rather than having other yellow flowers making up your background, you would like to include that nearby but not quite in the frame purple flower. Without cutting the purple flower, perhaps you can attach one of your two Plamps to it and pull it over enough to be included in your composition without harming it. This is all possible because you know of the pleasing complementation of yellow and purple and because you had Plamps in your camera bag!
Here’s another thought. Wildflowers, the frequent subjects of many close-up photographers, are generally protected. Picking them deprives others from enjoying the beauty of the lost flowers, and because so many flowers depend on seed production to propagate, picking disrupts future generations. Wild orchids are especially fragile and very sensitive to human disturbance. Spotted knapweed, on the other hand, is an invasive alien weed that covers vast tracts of otherwise pretty northern Michigan acreage where Barb and I like to do a lot of wildflower photography. Those flowers you can pick all you want. But, and this is important, if you’re unsure whether a flower is a native wildflower or an unwanted invasive or noxious weed, please don’t pick it.
TILTING THE SUBJECT FOR A BETTER BACKGROUND
Your Plamps can be employed to change the viewpoint just by tilting a flower. Perhaps you want to shoot up at your flower against a blue sky background. Use the Plamp to tilt the flower forward to enable you to shoot up at it just a bit. Or tilt the flower back to have nicer flowers in the background. The Plamp lightly grasps the stem of the plant to avoid injuring it. For flowers with extremely fragile stems, the holes in the clamping end can be used to stabilize the flower without putting any pressure on the stem at all. Use your Plamps to help you modify the shooting angle without hurting the subject! We do it routinely.
You may think that our seemingly incessant rambling about Plamps suggests some personal interest in them. Okay. We admit to a personal interest. We admit that we’re so thoroughly enamored with their extreme usefulness in so many aspects of close-up photography that we had to cover them in great detail here just as we do at our lectures, seminars, and workshops. We really don’t understand how you can be a productive close-up photographer without using them!
ENVIRONMENTAL FRIENDLINESS
You spot a sleeping caterpillar on a twig in the middle of a small leatherleaf bush. Due to the densely interconnected branches, it is exceedingly difficult to get a tripod in close enough to frame the caterpillar without disturbing the subject and without having a distractingly busy background. The caterpillar photographs much better if you clip the twig and move the twig bearing the caterpillar to the open and attach it to a Plamp. This allows selecting the most favorable side of the caterpillar, the best shooting angle, and it makes the now far more distant background record pleasingly out of focus. Since the photography takes place a few yards away, it prevents the bush from being trampled. After the photos are shot, the caterpillar is gently and safely returned to the wild by laying the twig back on the original bush to allow the unharmed insect to continue with its life.
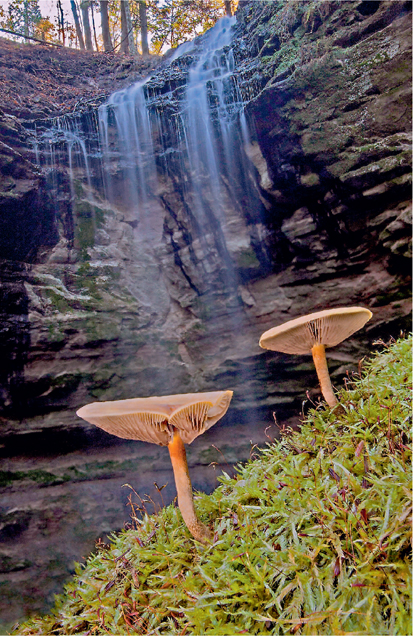
It’s fun to capture a macro scene where you fill the frame with a small subject, but use a wide-angle lens to capture the background behind it. The mushrooms are focused in the first image and the waterfall is focused on in the second image. This image is made from combining the two images with Zerene Stacker. Nikon D300, 18mm, 1/4, f/22, ISO 500, Shade, fill-flash.
FOCUS STACKING
Focus stacking is a technique in which multiple shots are taken along the length of a subject because depth-of-field alone could not get it all in sharp focus in a single shot. The multiple shots are then combined into a single image that is sharp throughout using special software in post-capture editing. The process can be carried out in some versions of Photoshop, or in specialized focus stacking software published by Helicon Focus at www.heliconsoft.com, or by Zerene Stacker at www.zerenesystems.com. Enormous depths-of-field are skillfully obtained this way. It opens up an entire new world of opportunities for the close-up photographer.
USING FLASH
Your flash can be a big help to obtain image sharpness. The benefit of flash is its very short duration burst of light. Depending on the power output and whether set manually or automatically, the light burst may range from a long 1/700 second (this is long?) to as little as 1/20,000 of a second (wow!). Such extremely short flash duration times easily freeze wind-blown subjects and arrest camera movement and vibration. Images are sharp! The downside is that depending on ambient light and your shooting parameters, the backgrounds might turn out unflatteringly black.
Over our decades of close-up photography, the idea of handholding a camera was belittled as not allowing properly studied compositions, not allowing careful focus, and not allowing small enough apertures to give sufficient depth-of-field. Nowadays, however, it may be okay to handhold when the camera has some combination of image stabilization and substantial light available, whether from ambient, from flash, or both at the same time. Nonetheless, using a tripod is highly recommended anytime its use is possible.
IMAGE STABILIZATION
Image stabilization is one of the recent electronics wonders favoring photographers. It comes in two flavors—systems that manipulate the lens or the sensor, called “optical stabilization”, and systems that manipulate the electronic image, called “digital stabilization.” Most camera systems commonly used by the close-up crowd will use optical stabilization, that Canon oddly enough calls “IS” for “Image Stabilization,” that Nikon calls “VR” for “Vibration Reduction,” and that others call by various names.
Those systems that are already good and rapidly getting better offer a few stops of improvement in motion stopping capability. For example, the latest Nikon VR systems claim a 4 stop improvement. Recall the rule of thumb that the slowest shutter speed suitable for handholding your system is the reciprocal of the focal length, i.e., if shooting a 100mm lens, you may handhold only at shutter speeds down to 1/100 second. But, if your stabilization system allows a 4 stop improvement, then you can shoot the 100mm lens handheld at any shutter speed down to 1/6 second!
Marketing hype being what it is, it’s probably a good idea for all photographers to individually test their personal handholding capabilities. Point your camera at a target with fine detail—perhaps a newspaper tacked to a wall, or a postage stamp, or a dollar bill, and shoot at various shutter speeds. Critically examine the results on your computer at 100 percent magnification and determine your own limit of sharpness. Then, for safety, add 1 stop of shutter speed to that number for your own guideline.
I tested Sigma’s new 180mm f/2.8 macro with optical stabilization while writing this book, and it performed well. I was able to get acceptably sharp images handheld at 1/100 second and consistently shot crisp images at 1/200 second. I could not capture sharp images at slower shutter speeds. This isn’t surprising! Although many non-macro lenses enable sharp images when shot with a shutter speed that is only about one-quarter of the focal length, it doesn’t work with macro lenses. Why? Consider a 24mm lens. The handheld guideline suggests one should be able to shoot sharp images at 1/24 second. Your camera doesn’t offer that exact shutter speed, so round it off to 1/30 second. If the optical stabilization is available and activated, then it may still produce sharp images with one-half second shutter speeds. It can do this because the picture elements in the image are not highly magnified and are moving over a much smaller percentage of the image real estate. Conversely, in macro photography, the subject is highly magnified and the picture elements are gyrating over far more of the imaging sensor—making it more difficult for the optical stabilization system to keep everything sharp. Currently, you can only hope for a couple of stops of usable slower shutter speeds in close-up photography—though, these systems will steadily improve in the years to come.
Warning! Do not activate optical or electronic stabilization (if you have it) when shooting on a tripod. When the camera is perfectly still on a solid tripod, the stabilization system on many lenses or in the camera will activate in its hunt for vibration. If the lens isn’t vibrating because it is on a tripod, the system may create its own vibration while hunting for non-existent lens movement and cause soft images. We see this happen often in field workshops. Anytime a student complains nothing is sharp in the image and we know it isn’t a case of missed focus, more likely the stabilization system is activated. However, some systems are able to detect when the camera is supported on a tripod and the system is automatically deactivated.
Handheld shooting, which we have all been cautioned against, is sometimes unavoidable. Although it limits the ease of careful composition, the bugaboo of camera movement can be somewhat mitigated by:
✵Using a higher than usual ISO.
✵Activating image stabilization.
✵Using an aperture that allows a satisfactory DOF and a high shutter speed.
✵Using flash to provide a short burst of light that freezes all motion.
✵Being certain to focus precisely.
✵Being as steady as possible when shooting by assuming a stable stance, holding your breath, and being gentle with the shutter release.
✵Shooting numerous images to increase the odds of getting sharp ones.
✵Remembering exposure reciprocity and knowing that if your exposure is 1/125 second at f/11, you can also shoot at 1/1000 second and f/4. You sacrifice some DOF and gain a lot of shutter speed!
So, there you are. The viewing world seeks tack-sharp images. How do you know? Just read all of the ads for lenses and the user reviews. Sharpness makes up a large percentage of those texts—perhaps the largest. Sharpness is a key goal most of the time. You have just read our techniques to make your images razor sharp. Remember, nothing in photography is very complicated. You just need to remember a multitude of simple things. Well, now you may have even a few more things to remember, but if you make the effort to learn and apply them, you will be thrilled with your results!
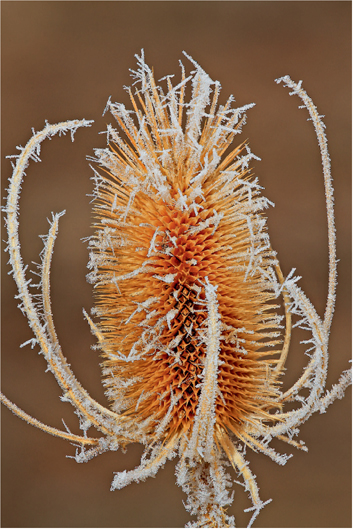
Frost is the best way to make Teasel attractive. Frost only develops when the air is still. Nevertheless, I attached a Plamp to the stem to hold it perfectly motionless. Thirteen images were assimilated into one image using Helicon Focus software in order to achieve the ultimate in sharpness. Notice f/11 was used because it is one of the sharpest apertures on the lens. There is absolutely no reason to stop down more because the depth of field is fully covered in the stack of images. Canon 5D Mark III, 180mm macro, ISO 200, f/11, 1/30, Cloudy WB.
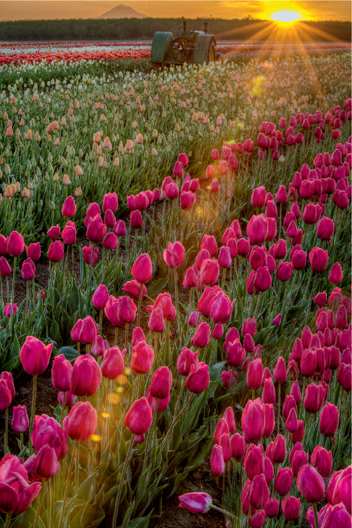
Sunrise is spectacular at the Wooden Shoe tulip field near Woodburn, Oregon. Because Barbara is especially imaginative, she decided to use diffraction in a uniquely beneficial way to produce a sunrise starburst. To get the starburst, Barbara stopped the lens down to f/22 and included the sun in the image. Even though the diffraction at f/22 reduces the overall sharpness of the image, using a small aperture was necessary to attain the starburst. Had it not been for wanting the starburst, Barbara would have focus stacked the image. The contrast between the dark foreground and the sun was extreme, so four different exposures were shot to cover the contrast in the scene. The shutter speed was changed by one stop for each exposure and all four images were combined into one using Photomatix Pro HDR software. Nikon D4, 70mm, ISO 400, f/22, 1/10, Sun WB.
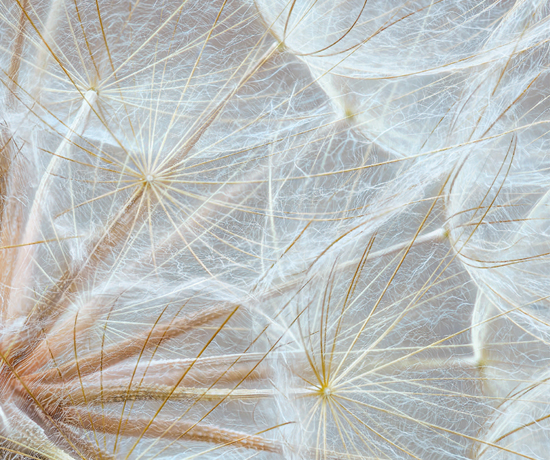
Goat’s Beard seed heads offer a wonderful opportunity for shooting enchanting patterns. The soft overcast light prevents excessive contrast. Barbara shot nineteen images and changed the focus slightly between shots to create her stack. Zerene Stacker is used to merge all of the images together to create a single image with tremendous overall depth-of-field that isn’t possible with a single capture. Nikon D4, 200mm, 2 seconds, f/11, ISO 100, Cloudy.