Guns the Right Way: Introducing Kids to Firearm Safety and Shooting (2015)
CHAPTER TEN
The Demonstration of Power
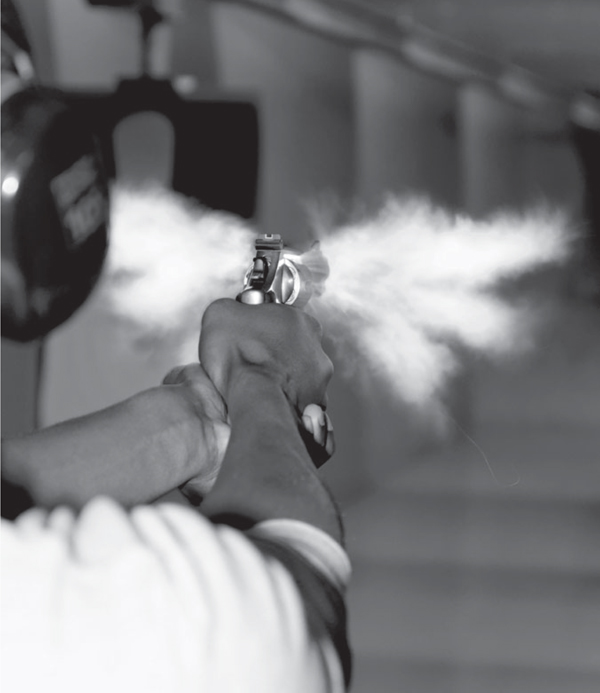
Several times in this book you have heard me refer to the demonstration of power when first introducing youths to firearms at the range. A demonstration of power is a central part of the learning process of guns and shooting. This is not meant to be used as a scare tactic to put a fear of firearms and firearm safety into a child, but rather a learning experience to demonstrate the fact that, no matter how small, a firearm needs to be always treated with the utmost care and respect.
If you have spent some time shooting for fun at various targets, you may recognize some of the tactics that are explained in the coming instructions. If not, I urge you to go out and experience these reactions to a bullet hitting different targets for yourself before you set up this demonstration.
Ideally, I like to do this demonstration with three different calibers/sizes of projectile to demonstrate a point. If you do not have the option of three different calibers or sizes of projectile, simply proceed with the caliber at hand.
My preferred calibers for a demonstration of power are the .223 Remington, the .22 long rifle, and .177 caliber air rifle.
MAKE SOMETHING HAPPEN
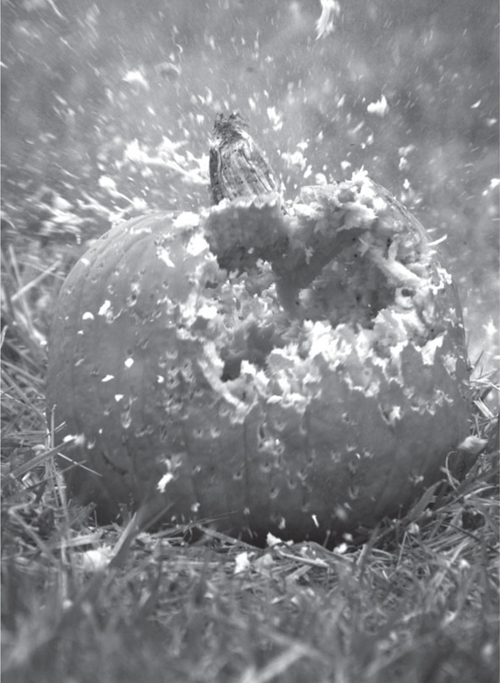
Use “reactive” targets. When introducing kids (or anybody) to shooting, forget boring paper targets. Ringing or knocking down steel targets is much more exciting and gratifying. Rocks, pieces of brick or cement blocks fly off when hit, often leaving a cloud of dust. Plastic water bottles filled with colored water are spectacular when hit with a high-velocity round like a .223 Remington. Red Kool-Aid is cheap and the results are instantly gratifying. You might even slip in a Tannerite target as a surprise. There is plenty of time later to learn how to shoot groups on paper, but to generate and keep their interest use targets that react.
- Bryce Towsley, noted outdoor writer and author
.223 REMINGTON
I choose the .223-caliber because it is a high-velocity projectile that, when loaded with a softpoint or hollowpoint bullet, results in violent reactions downrange on some relatively large targets such as gallon jugs of water, watermelons, cantaloupe or grapefruit. They will completely evaporate an orange.
In addition, the .223 Remington has a very traditional rifle cartridge shape, meaning it has a relatively large brass case compared to its bullet, with a defined neck and shoulder, and is fired with a separate primer from the case.
As Bryce Towsley commented in the beginning of this chapter, gallon jugs and two liter bottles filled with water and food coloring or a package of Kool-Aid make a spectacular display when hit with a .223 Remington, and especially if there is snow on the ground. No snow? I have also done this demo in the summertime using an old white sheet to give a blank background so that the pupils can see and experience the reaction.
Finally, all of these pluses to the .223 Remington are further enhanced by its ability to be fired by even the youngest of shooters with no noticeable recoil.
If I have a group of entirely new shooters, I will fire the rounds at my chosen targets. Should I have some experienced shooters with me or in a group, I let one of them fire at the downrange reactive target.
.22 RIMFIRE
The choice of this caliber is also twofold. While the .22-caliber rimfire has the same bullet diameter as the .223 Remington, the cartridge tends to be (or at least noticeably appears to be) smaller in size compared to the .223.
A .22-caliber rimfire produces zero recoil, a moderately loud “bang” upon fire, and has a differing mechanism of igniting the powder. Rather than hitting a primer that is inserted separately into the cartridge case, the .22-caliber rimfire has the primer loaded into the “rim” on the bottom of the cartridge. The primer strikes the rim near the outer edge, igniting the primer chemicals, which ignite the powder in the cartridge case.
The cartridge case is also noticeably different, as a .22-caliber rimfire case is completely straight with no “shoulder or “neck,” as well as being significantly smaller than the cartridge case for the .223 Remington.
.177-CALIBER AIR RIFLE
The increased popularity of guns and shooting over the past decade or so has been a real boon to the air rifle market. Many people who have chosen to go out and buy their first firearm, be it traditional rifle, shotgun, handgun or modern sporting rifle, have found that, while they are a great deal of fun to shoot, they require significant space and, in the case of an urban or suburban resident, usually a long trek to someplace safe to shoot. That can cause frustration should someone wish to practice their shooting more often or in shorter duration periods closer to home.
The nice thing about an air rifle is that, with very minor expenditures of time and money, an air rifle can be fired in the backyard and even the basement. (Be sure to check and comply with local ordinances, and use an appropriate backstop. A cardboard box full of old telephone books and/or newspapers is often adequate to stop a pellet.)
Furthermore, an air rifle works via a pneumatic pump, a cartridge of compressed air or a spring piston to force air under pressure through the barrel when the trigger is pulled. This means that there is no cartridge, primer or powder, but rather simply the (usually lead) projectile. The pellet is also noticeably smaller than both the .22-caliber long rifle and the .223 Remington in both length and diameter.
Finally, the increase in the purchase of air rifles has increased competition in that space, leading to a much higher quality product at a lower available price point than ever before.
SETTING UP THE DEMONSTRATION
The very first thing I do is present the three different types of ammunition I will be using for the demonstration. I tell students which cartridge/projectile is which caliber, and which gun I will be using them in. Then, I asked them several questions.
What are some of the features of this cartridge? How does the .223 cartridge differ from the .22-caliber rimfire cartridge? Do you notice something different about the .177-caliber pellet? What is it?
Most children who have never seen these different types of cartridges will have questions and comments. One of the most frequent questions you will get is what makes the pellet fire, if there is no case, powder and primer? Remember, everything about introducing youth to guns is about safety and having fun. Having a great deal of engagement in the form of questions and answers is a great way to introduce knowledge, and more knowledge equals a greater degree of safety.
To be most effective, the demonstration should be set up at a relatively short distance so that your intended audience will have an “up close and personal” view of the reaction of the target.
I prefer to shoot three, different sized targets - one for each caliber.
For the .223 Remington, I most often use a gallon jug or two liter bottle filled with water or water that has been colored with Kool-Aid. That jug, at between 50 and 75 feet, when shot with a hollowpoint or frangible bullet from my bolt-action .223 Remington, creates a large burst and spray of liquid, as well as significant damage to the gallon jug or 2-liter bottle.
Moving on to the .22 rimfire, I most often use a soda can that has been filled with water. My bullet of choice (and also regardless of which bullet I have shown them in demonstration) for the .22 rimfire is a hyper-velocity, hollowpoint bullet. When the bullet strikes the can of water, it also produces a very large splash and significant damage to the can, most often creating a large jagged hole and even sometimes blowing the can into two separate parts.
For the .177-caliber air rifle, I usually choose an unopened can of soda. This choice is simply because this usually creates a more “visual” reaction immediately upon the pellet striking the can than if it were filled with plain water. A flattop pellet or one of today’s new “hi shock” pellets enhances the visual impact of this demonstration.
After the initial “shock and awe” of the violently reacting targets, I send the students to retrieve all of the pieces.
Next, we discuss what happens to each target and why. I discuss how bullets work, the concept of mushrooming as well as hydrostatic shock, but only to the extent that demonstrates a bullet can make a much larger hole than its diameter.
As some of the targets are too mangled to use for the next demonstration, I ask the students what things can they name that are approximately the same size as the targets that we have just shot?
There are all kinds of answers…
They sometimes talk about toys, other similar sized objects, etc.
Then, after holding up the damaged gallon jug, I take an empty, non-shot gallon jug and hold it up next to or in front of one of the children’s heads. Then I move it down across their body to show them the approximate area a gallon jug will cover.
Next, I bring out a “trump card” to demonstrate why we are always cautious around firearms. “Who knows a lot about the human body?”
I then explain that the human body is made up of over 70%… WATER! While explaining this I again take the jug and hold it up to my head, to my chest, to my leg, across my arm, etc.
It always is a sobering moment for them.
Next, I hold up the .223 cartridge next to the .22 cartridge.
“Even this much smaller bullet and cartridge can do a tremendous amount of damage if it manages to hit somebody’s body.”
I hold a can up to my face and ask, which side do you think I could do better without? They often laugh, but then I explain, “imagine the damage from this can right here, or here (moving it down to the middle of my chest) or here (moving it out across my arm).”
Finally, there is the portion that I call “the speech.”
“Remember… What we have here is something that can be a great deal of fun, and something that you hopefully will enjoy doing for the rest of your life. It is also a very dangerous and deadly weapon when mishandled or used improperly.
“This dangerous weapon can hurt you, it can hurt me, it can hurt your parents, your brothers, your sisters, and other people that you love and care about. It can hurt your dog or cat. It can hurt people standing next to you and it can hurt people standing far away from you.
“Because of this, we are always very careful and we always, always follow the 10 Commandments of gun safety whenever we are holding or near firearms. Safety is something that we take very seriously here, and if we feel there is an unsafe situation, we will immediately correct it.
“It is nothing against you and it is nothing against any person who makes a mistake. That’s why we are here. To teach and prevent mistakes. Is everybody okay with that?”
I have found in both teaching and my decades long sales career that one of the most important portions of every interaction where you are trying to convey a point or message used is to gain agreement. Always ask for the child’s agreement with every question that you ask or lesson that you are teaching.
Notice that the speech is rather short and very much to the point. Remember our two rules… Number one when we shoot we are always safe. Number two we have fun.
Keeping the lessons short but to the point enhances the “fun” portion of your teaching interactions.
In my surveys of the youth I have introduced to firearms, one of the things they report that most stands out is the demonstration of power. However, the largest impact I have found this demonstration makes is on the student’s parents when they talk about what happened, or perhaps they get to even see directly. They are amazed at how deeply engaged the children are and the impact that it seems to make on their conscience.
Kids are smart…and that is good news for you!